# Intro

## What is Nucleon?

Nucleon is a liquid staking solution for Conflux PoS backed by industry-leading staking providers. Nucleon lets users stake their CFX- without locking assets or maintaining infrastructure.&#x20;

Our goal is to solve the problems associated with Conflux PoS staking - illiquidity, immovability and accessibility - making staked CFX liquid and allowing for participation with any amount of CFX to improve security of the Conflux network.&#x20;


# Overview

Nucleon is a liquid staking solution for Conflux PoS backed by industry-leading staking providers. Nucleon lets users stake their CFX- without locking assets or maintaining infrastructure.

Our goal is to solve the problems associated with Conflux PoS staking - illiquidity, immovability and accessibility - making staked CFX liquid and allowing for participation with any amount of CFX to improve security of the Conflux network.

### How does Nucleon work?

When staking with Nucleon, users receive xCFX tokens representing their staked CFX. xCFX balances can be used like regular CFX to earn yields and lending rewards, and are updated on a daily basis to reflect your CFX staking rewards. Note that there are no lock-ups when staking with Nucleon, and a minimum deposit of 1 CFX to decrease DDoS risk.

When using Nucleon, staking rewards will be compound in real-time, allowing for participation in the securing of Conflux without the associated risks and downside potential.

### What Makes Nucleon Unique?

Nucleon is the very first liquid staking solution to launch on Conflux eSpace, an EVM-compatible smart contract execution environment build on top of Conflux that allows developers to deploy and execute Ethereum-native dApps and smart contracts within the Conflux ecosystem. NUCLEON aims to build the most robust liquid staking ecosystem on Conflux, with plans to give users more opportunities to participate Conflux POS staking without decrease users token liquidity.

### How Is the Nucleon Secured? <a href="#how-is-the-nucleon-network-secured" id="how-is-the-nucleon-network-secured"></a>

Nucleon is Open-sourced & was audited by Hacken. Nucleon can be supported by the wallets on Conflux eSpace. These include MetaMask, WalletConnect, TokenPocket，Ledger and Fluent Wallet.


# Liquid Staking

Liquid staking protocols allow users to earn staking rewards without locking assets or maintaining staking infrastructure. Users can deposit tokens and receive tradable liquid tokens in return. The contract stakes these tokens using elected staking providers. As users’ funds are controlled by the contract, staking providers never have direct access to the users' assets.

Staking on Conflux requires expert knowledge and complex and costly infrastructure. There are several reasons why - the main being the fact that slashing and offline penalties can get very severe if the staking is managed improperly. In addition to this, self-staking brings with it a minimum deposit of 1,000 CFX and a token lock-up about 14 days.

Through the use of a liquid self-staking service such as Nucleon, users can eliminate these inconveniences and benefit from secure, non-custodial staking backed by industry leaders.


# Tokenomics

### Two Tokens: xCFX and NUT &#x20;

Nucleon has a two token model, which includes xCFX, and NUT.  &#x20;

xCFX is the interest-bearing ERC20 token that represents CFX staked into Nucleon’s PoS pool and it’s interest accrued in CFX over time. There is one type of xCFX, with an uncapped supply determined algorithmically, and will be tradeable. &#x20;

NUT is Nucleon’s governance token, which can be staked to vote and boost staking interest rewards. NUT token allocations are defined by the project team, and will be tradeable on secondary markets. &#x20;

### xCFX Token Model&#x20;

A user mints xCFX by staking CFX into Nucleon’s PoS Pool. xCFX is pegged 1:1 with CFX at network launch, but moving forward, each xCFX will include the basic value of staked CFX plus the interest accrued through [Conflux’s PoS mechanism](https://developer.confluxnetwork.org/v2-hardfork/pos_overview).&#x20;

Each xCFX is a claim on the staked CFX plus accrued PoS rewards, where the value of xCFX is affected by the automated [compounding ](https://www.investopedia.com/terms/c/compounding.asp)of PoS rewards, making Nucleon's APY always higher that other PoS Pools. After network launch, Nucleon will be accumulating PoS rewards. Suppose user A inputs a CFX (1), and the platform automatically gives user b xCFX according to the ratio of xCFX:CFX, which is c0 (c0 > 1). After the deposit and the time period t, the platform will gain n times of interest reward. Suppose that the interest reward of a single xCFX unit each time is mi (m1, m2, m3 … … mn).. We can assume that the PoS pool continuously gains rewards according to Conflux Network’s PoS mechanism, therefore, mi > 0. As Nucleon accumulates the interest rewards mi, the system will automatically calculate the latest value of each xCFX. From the time when user A deposits a CFX (1) at time t, the value of each xCFX ct is calculated as such: ct = c0 + sum (mi) \[For mi > 0 & ct > c0]. &#x20;

$$
c\_t = c\_o + \sum\_i m\_i
$$

When users withdraw xCFX to CFX, the xCFX to CFX withdraw value is determined the moment the withdrawal operation is confirmed as determined by Conflux POS mechanism - currently: 14 days.&#x20;

### $NUT Token

NUT is Nucleon’s governance token. NUT will be used to vote on proposals deciding the use of protocol treasury funds, and boost staking returns. &#x20;

#### Tokenomics&#x20;

**Ticker**: $NUT&#x20;

**Chain**: Conflux eSpace (ERC-20)&#x20;

$NUT has a total supply of 300,000 that will be released over a 4-year period with the following allocations: &#x20;

* Team: 10% distributed over 4 years&#x20;
* Marketing: 10% distributed over 4 years &#x20;
* Treasury: 20% going towards the DAO’s treasury with 1% of the treasury going towards the IDO on Swappi. &#x20;
* LP: 60% distributed over 4 years. &#x20;

#### Emission Schedule <a href="#emission-schedule" id="emission-schedule"></a>

Below are the emission rates:

<table><thead><tr><th width="123" align="center">Month</th><th width="185" align="center">Release Percentage</th></tr></thead><tbody><tr><td align="center">1</td><td align="center">6.24%</td></tr><tr><td align="center">2</td><td align="center">5.88%</td></tr><tr><td align="center">3</td><td align="center">5.53%</td></tr><tr><td align="center">4</td><td align="center">5.20%</td></tr><tr><td align="center">5</td><td align="center">4.89%</td></tr><tr><td align="center">6</td><td align="center">4.60%</td></tr><tr><td align="center">7</td><td align="center">4.33%</td></tr><tr><td align="center">8</td><td align="center">4.08%</td></tr><tr><td align="center">9</td><td align="center">3.84%</td></tr><tr><td align="center">10</td><td align="center">3.61%</td></tr><tr><td align="center">11</td><td align="center">3.40%</td></tr><tr><td align="center">12</td><td align="center">3.20%</td></tr><tr><td align="center">13</td><td align="center">3.01%</td></tr><tr><td align="center">14</td><td align="center">2.83%</td></tr><tr><td align="center">15</td><td align="center">2.66%</td></tr><tr><td align="center">16</td><td align="center">2.50%</td></tr><tr><td align="center">17</td><td align="center">2.36%</td></tr><tr><td align="center">18</td><td align="center">2.22%</td></tr><tr><td align="center">19</td><td align="center">2.09%</td></tr><tr><td align="center">20</td><td align="center">1.96%</td></tr><tr><td align="center">21</td><td align="center">1.85%</td></tr><tr><td align="center">22</td><td align="center">1.74%</td></tr><tr><td align="center">23</td><td align="center">1.64%</td></tr><tr><td align="center">24</td><td align="center">1.54%</td></tr><tr><td align="center">25</td><td align="center">1.45%</td></tr><tr><td align="center">26</td><td align="center">1.36%</td></tr><tr><td align="center">27</td><td align="center">1.28%</td></tr><tr><td align="center">28</td><td align="center">1.21%</td></tr><tr><td align="center">29</td><td align="center">1.13%</td></tr><tr><td align="center">30</td><td align="center">1.07%</td></tr><tr><td align="center">31</td><td align="center">1.00%</td></tr><tr><td align="center">32</td><td align="center">0.95%</td></tr><tr><td align="center">33</td><td align="center">0.89%</td></tr><tr><td align="center">34</td><td align="center">0.84%</td></tr><tr><td align="center">35</td><td align="center">0.79%</td></tr><tr><td align="center">36</td><td align="center">0.74%</td></tr><tr><td align="center">37</td><td align="center">0.70%</td></tr><tr><td align="center">38</td><td align="center">0.66%</td></tr><tr><td align="center">39</td><td align="center">0.62%</td></tr><tr><td align="center">40</td><td align="center">0.58%</td></tr><tr><td align="center">41</td><td align="center">0.55%</td></tr><tr><td align="center">42</td><td align="center">0.51%</td></tr><tr><td align="center">43</td><td align="center">0.48%</td></tr><tr><td align="center">44</td><td align="center">0.46%</td></tr><tr><td align="center">45</td><td align="center">0.43%</td></tr><tr><td align="center">46</td><td align="center">0.40%</td></tr><tr><td align="center">47</td><td align="center">0.38%</td></tr><tr><td align="center">48</td><td align="center">0.36%</td></tr></tbody></table>


# Security

* Audit by Hacken

{% file src="/files/wZ1UHkSlao8QJclnOqyJ" %}

* Open-sourcing & continuous review of all code.
* Use of DAO for governance decisions & to manage risk factors.
* Best-in-class validators to minimise staking risk.
* No oracle is used, all information comes from the blockchain.


# Governance

Governance is run by a community of stakeholders incentivized to participate in the organization’s operations by a shared goal, and use NUT as governance token by an additional cryptoeconomic mechanism.

<figure><img src="/files/hK5IGo5aUoF22rtmqNgZ" alt=""><figcaption><p>Nucleon Governance Process</p></figcaption></figure>

### Governance Process &#x20;

Below is the governance process for the Nucleon DAO. &#x20;

#### Step 1: Forum (Reddit - <https://www.reddit.com/r/NucleonOfficial/>) &#x20;

* All ideas and proposals are originally published on reddit for community feedback. &#x20;
* Improvements and objections are noted and incorporated. &#x20;
* Timeframe: At least 7 days &#x20;

#### Step 2: Pre-Poll (Reddit)

* The Proposal will incorporate feedback from Step 1 and put it to a preliminary vote on Reddit.
* The Nucleon Team can directly introduce a proposal for a preliminary vote.
* Timeframe: At least 7 days &#x20;

#### Step 3: Voting (<https://www.nucleon.space/#/data/nut>) &#x20;

* Voting power is proportional to veNUT. &#x20;
* Timeline: At least 7 days, and voting doesn’t end on weekends&#x20;
* For Support: A proposal must receive more than 50% of YES votes to pass. This also applies to multiple choice options in a proposal. &#x20;
* Quorum: At first there is no requirement. &#x20;

#### Step 4: Enactment &#x20;

* Nucleon team manually implements proposals that have received support. No automation.&#x20;

&#x20;


# Proposal Outline

### Types of Proposals&#x20;

The Nucleon DAO is now accepting community proposals to their forum. Below is a non-exhaustive list of the types of proposal that are being accepted: &#x20;

* Governance Updates: Proposal that modifies the current governance process.&#x20;
* Use of Treasury: Proposal to transfer tokens outside of the DAO's treasury&#x20;
* Technical Changes: Proposal to perform a parameter change in one of the contracts controlled by the DAO.&#x20;

### Proposal Outline&#x20;

Below is the outline for community proposals. To submit your proposal, please fill out completely the outline below and submit to the Nucleon forum (<https://www.reddit.com/r/NucleonOfficial/>). &#x20;

1. Title:
   * Provide a short and succinct title for your proposal.
2. Proposal Type:
   * Specify the type of proposal you are submitting.
3. Summary:
   * Describe what your proposal is about.
4. Contact Information
   * Please provide your contact information and any project(s) you are representing with your proposal.
5. About:
   * Please provide a description of your project(s), with links to socials and website, if applicable.
6. Abstract:
   * Provide a short description of the proposed change.
7. Motivation
   * Explain why you think your proposal is beneficial to Nucleon.
8. Specification
   * Provide any relevant technical AND/OR financial details, if applicable
9. For
   * What are some reasons why this proposal should be voted for.
10. Against
    * What are some reasons why this proposal should be voted against.


# Fees

Nucleon applies zero stake fee and a 10% fee on a user’s staking rewards.  This fee will split between node Service provider, the DAO, and a coverage fund.

Low gas Fees: Nucleon runs on Conflux eSpace, a blockchain with much lower transaction costs than Ethereum or Bitcoin.&#x20;

Decentralized: Trade directly from your wallet of choice and retain 100% ownership of your own crypto. &#x20;


# Risks

There exist a number of potential risks when staking CFX using liquid staking protocols.

### Smart contract security

There is an inherent risk that Nucleon could contain a smart contract vulnerability or bug. The Nucleon code is open-sourced, audited and covered by an extensive bug bounty program to minimise this risk.

### Conflux PoS network - Technical risk

NUCLEON is built on Conflux and there is no guarantee that Conflux PoS network has been developed error-free. Any vulnerabilities inherent to Conflux PoS network brings with it slashing risk, as well as xCFX fluctuation risk.

### Slashing risk

Conflux PoS validators risk staking penalties, with up to 100% of staked funds at risk if validators fail. To minimise this risk, NUCLEON stakes across multiple professional and reputable node operators with heterogeneous setups, with additional mitigation in the form of coverage that is paid from NUCLEON fees.

### xCFX price risk

Users risk an exchange price of xCFX which is lower than inherent value due to withdrawal restrictions, making arbitrage and risk-free market-making impossible. The X DAO is driven to mitigate above risks and eliminate them entirely to the extent possible. Despite this, they may still exist and, as such, it is our duty to communicate with them.

### xCFX minter role

xCFX is a type of token which is minted and burned by users completely. Users need to burn the token they owned only to get back the corresponding CFXs. Therefore, in Exchangeroom contract, a function called XCFX\_burn() is needed to feed the objective.

After the XCFXupgradeable contract is deployed, Exchangeroom contract will be assigned as the only minter of xCFXs. Then the users can stake CFXs to exchange xCFXs in Exchangeroom. Exchangeroom will mint xCFX tokens for users. In order to withdraw, the users invoke XCFX\_burn() function and Exchangeroom will burn xCFX tokens for users. Then users can withdraw their CFXs by calling getback\_CFX() function.

In addition, in order to prevent the owner from abusing, we will assign the owner of xCFX token proxy to ZERO address once the contract runs normally. Therefore, no new minters are added to xCFX contract.


# About Conflux Network

Conflux is a new secure and reliable public blockchain with very high performance and scalability. It can achieve the same level of decentralization and security as Bitcoin and Ethereum but provide more than two orders of magnitude improvement on transaction throughput (TPS) and finality latency.

The major superiority of Conflux hinges on its novel design of consensus protocol, authenticated storage, and transaction relay protocol. In Conflux ledger, blocks are organized as Tree-Graph where each block references some other blocks with one of them being its parent block. By only looking at the blocks linked with parent edges, the ledger appears to be a tree structure (parental tree), while by looking at all the blocks, it appears to be a directed acyclic graph. This is also the reason that we call the ledger structure of Conflux as Tree-Graph.

### Tree-Graph

The consensus algorithm of Conflux, which is called Greedy-Heaviest-Adaptive-SubTree (GHAST), enables all the nodes in the blockchain network to consistently agree on a pivot chain of blocks by applying the heaviest subtree rule on the parental tree in the ledger, and in turn reach the consensus on the total order of all the blocks based on the pivot chain. GHAST also allows the Conflux nodes to detect some attacks (e.g., balance attack that tries to generate two balanced subtrees) that may hurt the liveness, i.e., the ability to confirm transactions, and thwart these attacks by adaptively adjusting the weights of the blocks.

The Tree-Graph ledger and the GHAST consensus algorithm make Conflux nodes be able to quickly generate new blocks without worrying about that the existence of forks in the ledger may harm the security of the network, and hence enable the system to achieve both the high throughput and the low transaction confirmation latency.

Conflux employs account model and supports the smart contract. Its smart contract is compatible with Solidity, which is Turing complete, as used in Ethereum. Conflux uses merkle patricia tree as the major structure for its authenticated storage used for the states of the accounts and the smart contracts. Instead of using a single multi-version merkle tree, Conflux uses multiple merkle trees for each version of the states. High-level speaking, it consists of a snapshot tree and the delta trees. The delta tree is always held in memory and it contains all the state updates from the last snapshot. The snapshot tree, instead, is read-only during the eNucleoncution of the transactions. This design makes the transaction eNucleoncution in Conflux more efficient because it can utilize the memory more effectively when accessing the state in the storage. The delta tree typically contains the most frequently accessed data, and since the state size is small in delta tree, the depth of the tree can also be shallow, which makes the memory be able to hold more effective data.

In addition, Conflux employs a novel transaction relay protocol to improve the effective utilization of the network bandwidth for transaction propagation since, in Conflux, the network bandwidth could become the real bottleneck. In order to reduce the redundant transaction propagation, a Conflux node first sends out to its peers an announcement containing the transaction ids that the peers may not have seen before, and then let the peers request the transactions that they really need. Conflux introduces an efficient encoding for the transaction id to achieve a good trade-off between the size and the security.


# About Conflux PoS

Through CIP-43 Hydra has introduced a PoS system to improve the finality of the whole Network. CFX holders can stake their CFX to PoS to protect high-value transactions and also earn CFX rewards of participating the PoS. There might be a 51% attack problem in the early stage of a PoW chain when the hashing power is low. This became an even more significant issue when hashpower rental platforms emerged along with the development of public blockchains. Ethereum Classic, Grin, and Verge have all been the victims of the 51% attack last year.

To deal with the threats caused by 51% attacks, Conflux will introduce a stand-alone PoS chain. The consensus participants of the PoS chain will sign the pivot of the tree structure regularly. All PoW miners should select the pivot with enough signatures into the pivot chain, even if its sibling blocks have higher weights. Briefly speaking, the PoS chain specifies a pivot block, and all PoW miners should follow that block.

This means as long as the PoS consensus votes to a pivot block, even if the 51% attackers try to reverse the block, it won’t be recognized by the PoW nodes.

Conflux requires the PoS consensus to use the power of specifying pivot blocks in a restrictive manner. A block must be confirmed for a few minutes under the PoW rules before the honest PoS nodes will sign it. This means that the block sorting and confirmation of the tree graph are still accomplished by the PoW miners.

The PoS chain is only used to deal with 51% of attacks. Therefore, it only includes basic features such as pivot block voting and voting committee election. It does not include the functionalities of general blockchains such as transactions and contract eNucleoncutions.

The PoS chain features are built-in functionalities in the nodes of Conflux. Externally, there is still only one program: conflux-rust.

In this document, the Conflux chain refers to the running blockchain, and the PoS chain refers to the newly introduced chain.

There is approximately 1 PoS block generated per minute. All the times stated below are corresponding to the number of blocks.

{% embed url="<https://developer.confluxnetwork.org/v2-hardfork/pos_faqs/>" %}


# Choosing a Wallet

To get started with Nucleon, the first thing you’ll need is to set up a wallet that supports Conflux eSpace. We recommend using one of the supported wallets for interacting with Nucleon.&#x20;

#### Supported Wallets&#x20;

Nucleon currently supports [MetaMask](https://metamask.io/), [Fluent Wallet](http://fluentwallet.com/), [Token Pocket](https://www.tokenpocket.pro/), [OKX](https://www.okx.com/web3) and [OneKey](https://www.onekey.so/)

You can also user your Ledger device with Nucleon through MetaMask. Refer to [Using Your Ledger Hardware Wallet with Nucleon](/getting-started/using-your-ledger-hardware-wallet-with-nucleon) to learn how.&#x20;


# Connecting Your Wallet to eSpace

{% hint style="info" %}
*If you want to use Fluent instead of MetaMask, you can skip this section. Fluent has a connection to Conflux eSpace by default.*&#x20;
{% endhint %}

Now that you installed [MetaMask](https://metamask.io/), let's connect it to Conflux eSpace.&#x20;

To connect MetaMask to Conflux eSpace:&#x20;

1. Open MetaMask.&#x20;
2. Go to the Networks drop-down menu and click **Add Network**. &#x20;

   <figure><img src="/files/QYxbHMPEVwKHBYGeQR54" alt=""><figcaption></figcaption></figure>

   <figure><img src="/files/P18ijdQB228zMJgwAboz" alt=""><figcaption></figcaption></figure>
3. In Add a network, enter the following settings:&#x20;

* **Network Name**: Conflux eSpace Mainnet (or Conflux eSpace Testnet)&#x20;
* **New RPC URL**: [https://evm.confluxrpc.com](https://evm.confluxrpc.com/) (or [https://evmtestnet.confluxrpc.com](https://evmtestnet.confluxrpc.com/) for testnet)&#x20;
* **Chain ID**: 1030 (or 71 for testnet)&#x20;
* **Currency Symbol**: CFX&#x20;
* **Block Explorer**: [https://evm.confluxscan.net](https://evm.confluxscan.net/) (or [https://evmtestnet.confluxscan.net](https://evmtestnet.confluxscan.net/) for testnet)&#x20;

&#x20; 4\. Verify that the data you entered is correct and click **Save**.

<figure><img src="/files/mhkJocSgzGFIC2Lrkpwo" alt=""><figcaption></figcaption></figure>

Now, let's go ahead and fund your wallet.


# Getting CFX in Conflux eSpace

{% hint style="info" %}
&#x20;*To use Nucleon, you'll first need to fund your eSpace wallet with CFX in order to pay for gas transactions.*&#x20;
{% endhint %}

There are multiple ways to get in CFX in Conflux eSpace:&#x20;

1. [Buy it directly from KuCoin and transfer to your eSpace wallet](/transferring-assets-to-conflux-espace/from-exchanges/transferring-espace-cfx-from-kucoin-to-metamask).&#x20;
2. [Buy it directly from Gate.io and transfer to your eSpace wallet](/transferring-assets-to-conflux-espace/from-exchanges/transferring-espace-cfx-from-gate.io-to-metamask).&#x20;
3. [Bridging it from Conflux Core Space using the Fluent Bridge](/transferring-assets-to-conflux-espace/from-conflux-core/bridging-assets-from-conflux-core-with-fluent).&#x20;

Once you fund your wallet, you can proceed to bridge other assets to Conflux eSpace, or you can start using Nucleon.&#x20;

&#x20;

&#x20;


# Bridging Your Tokens to Conflux eSpace

Conflux Network supports bridging assets from other networks and from Conflux Core Space.&#x20;

{% hint style="warning" %}
*To bridge your assets to Conflux eSpace, you'll first need to fund you Conflux eSpace wallet to be able to pay for **gas** and claim your bridged assets.*

To get CFX on Conflux eSpace, you'll need to either:    &#x20;

* [Transfer it from Conflux Core Space](/transferring-assets-to-conflux-espace/from-conflux-core), using the Fluent Wallet bridge. Bridging assets from Conflux Core Space is free.  &#x20;
* [Transfer it from KuCoin](/transferring-assets-to-conflux-espace/from-exchanges/transferring-espace-cfx-from-kucoin-to-metamask), which lists native eSpace CFX (not wrapped). &#x20;

See the [Transferring Assets to Conflux eSpace](/transferring-assets-to-conflux-espace/overview) section for more information.&#x20;
{% endhint %}

* To learn how to bridge tokens from Conflux Core to Conflux eSpace, see:&#x20;
  * [Bridging Assets From Conflux Core with Fluent](/transferring-assets-to-conflux-espace/from-conflux-core/bridging-assets-from-conflux-core-with-fluent)&#x20;
  * [Using the Fluent Cross-Space Bridge to Transfer ERC-20 Tokens](https://medium.com/conflux-network/using-the-fluent-cross-space-bridge-to-transfer-crc-20-tokens-bdaee921f335)&#x20;
* To help you decide which cross-chain bridge to use, see: [Bridges to Conflux eSpace](http://link-pending/).&#x20;
* To learn how to bridge tokens from other networks to Conflux eSpace, see:&#x20;
  * [Bridging Stablecoins with Meson](/transferring-assets-to-conflux-espace/from-other-networks/bridging-stablecoins-with-meson)&#x20;
  * [Bridging Assets from Ethereum with cBridge](/transferring-assets-to-conflux-espace/from-other-networks/bridging-assets-from-ethereum-with-cbridge)&#x20;
* Optionally, you can also transfer CFX natively from Exchanges to Conflux eSpace without the need from any bridge. See [From Exchanges](/transferring-assets-to-conflux-espace/from-exchanges) to learn how.&#x20;


# Adding Your Bridged Tokens to MetaMask

Once you bridge your tokens, you'll need to import (or add) the bridged tokens to your wallet so that you're able to see the balance of tokens your account and transact with them. By default, most wallets (including MetaMask) do no show them.&#x20;

Adding tokens to Nucleon is super simple. To add a token:&#x20;

1. Go to [Swappi](https://swappi.io/).&#x20;
2. Expand Select a token to open the Select a token dialog.

   <figure><img src="/files/aPL1FlIjzjMNQJY5WXwz" alt=""><figcaption></figcaption></figure>
3. Click the add (+) icon next to the token that you want to add.

   <figure><img src="/files/ONfKURVTWXgeHKbGIzXJ" alt=""><figcaption></figcaption></figure>
4. In MetaMask, click **Add Token** to finish adding the token.

   <figure><img src="/files/Hk3kvurP2YrsvL4EuNei" alt=""><figcaption></figcaption></figure>

You have now added an ERC-20 token to MetaMask. Now let's continue and connect MetaMask to Nucleon.


# Connecting MetaMask to Nucleon

To get started with Nucleon, the first thing you’ll need is to set up MetaMask. To do this, please:

1. Open Nucleon: <https://www.nucleon.space/>
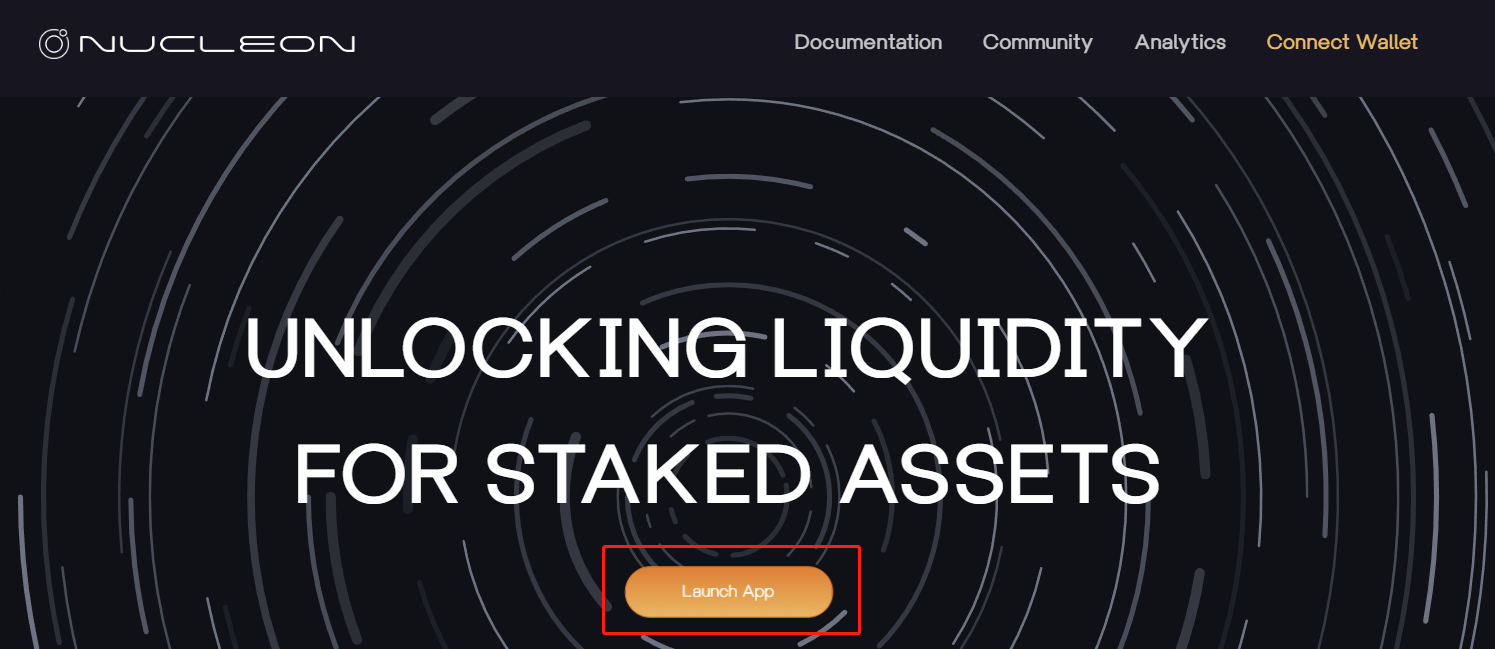
2. Click on Launch App.

<figure><img src="https://lh4.googleusercontent.com/d8D1HuBeViUgyD2KXydE1psTZ6U4FXYJ13mved9Vl8uuPFA10i_kgVeNd3GuxxsYyXLSl0AyTX4Jp7QZAKPi8fCfPeXxIoLBGcsUgEPzztP58yiRXPzG3ASTmtWQtepHmcjUmDharHPekrgdQGKX4PlqJoDamdK9RrQ6-LmoAa78ZHT8kdi8Eg8X3Gwvdg" alt=""><figcaption></figcaption></figure>

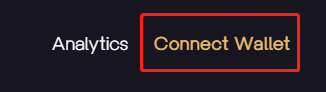
3. Click Connect Wallet to connect your MetaMask wallet to Nucleon.

<figure><img src="https://lh4.googleusercontent.com/C80eFsYIE3YMd9TOwpLFScZ476-MByo2eszoj3J765ek6FyT_2D7SCG57JavS3u9XbvCkylj3MeqQ-3IGjwbE3lzIo0JzkyldE4DcXAk2Ie0JjaTCaDuOcz9USN4tVwsf0rIP_ZRwx5fQ9nfuzCpKPja43dP1b0oeuTCZNZysFYkX6pLEqVAJuikHM5GVg" alt=""><figcaption></figcaption></figure>

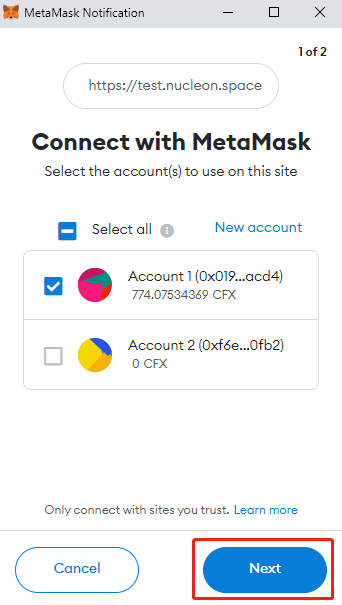
4. Enter your MetaMask password on the pop-out window; select the account that you wish to connect and click Next.

<figure><img src="https://lh3.googleusercontent.com/GxclsHTKGt1refuSTM24v-tjlMWzkXZN-Sndc1TILA-YUYbPLYYM3QUQlSzWojQdAo3hD_0UVvlJJ2FRMeTgVgU-xl8UPgExBMZdzqXfmCbuve8sIpGMlgv_fmqLtd_83-mT_tAYJ3xEMq0UPDon5PR3iLtMChZs2gWuDUj89UZi2bODsygGk4RrlbbZZg" alt=""><figcaption></figcaption></figure>

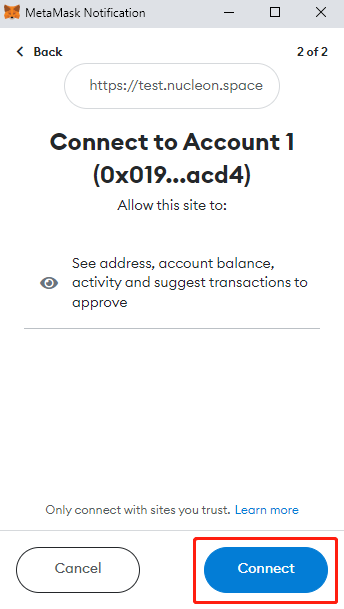
5. Click Connect to confirm the connection of your MetaMask account to Nucleon.

<figure><img src="https://lh4.googleusercontent.com/sa6ZC48leaGN_PRqIuINycrrrLbIama9rG9z_qmVrgsxOnbj28uU98psRQFyke0K8YxvfKx-VKmRS3jBmeXw8PO09RUolpA5wNdy_6i1bi1dVthJ3FJUInjoH3moi-yW-h00dmYfQBxfifOeWiqYQuW-6wQFmXgeNVUtOPOP1Rl4r3QZ_CYifnV2DE-bpw" alt=""><figcaption></figcaption></figure>

You have now successfully connected MetaMask to Nucleon.

<figure><img src="https://lh5.googleusercontent.com/RfWlLvQtIgnzV4yJ6Y-tEye1pNK9p01bFwGmoTQheVaDk5_ndjRjIFCp3_rVeEmwFKGvjV9ELqOM3zeB7YlksHqA12Po5s7n6kDeJbCoNtB1FuaeFfpIAVpGAS3Xa1GlU-iqsOSPTKMvj8LOL3DHIsoACcMVnAjZjS-k3b_S9W18GnLTvSdnf60BcZIOag" alt=""><figcaption></figcaption></figure>

<br>


# Using Your Ledger Hardware Wallet with Nucleon

{% hint style="danger" %}
Support for Conflux eSpace in Ledger devices is currently under review.
{% endhint %}

You can also use your [Ledger](https://ledger.com/) hardware wallet to trade on Nucleon, even before the official Conflux eSpace app on Ledger is released. To accomplish this, we'll need to enable blind signing in the Ethereum app of your Ledger device.

## Prerequisites

* Connect your Ledger wallet to MetaMask or Wallet Connect. See [*Using Ledger with MetaMask on Conflux eSpace*](https://developer.confluxnetwork.org/guides/en/using_ledger_on_espace/) to learn ho&#x77;*.* For the purposes of this guide, we'll use MetaMask.
* Enable Blind "smart contract data" or "blind signing" on your Ledger device. To learn more about bling signing, refer to [this article](https://www.ledger.com/academy/cryptos-greatest-weakness-blind-signing-explained) on Ledger's Academy portal.

## Enabling Blind Signing on your Ledger Device

1. Go to the **Ethereum** app in your Ledger device.
2. In the Ethereum app, go to **Settings**.

   <div align="left"><figure><img src="/files/q87dC3jDBXFRfDbieC0e" alt=""><figcaption></figcaption></figure></div>
3. **Enable** the blind signing option.

   <div align="left"><figure><img src="/files/8WBf6iVAPv61FUKYMiPD" alt=""><figcaption></figcaption></figure></div>

You have just enabled blind signing in your Ledger device!

## Using Nucleon with Your Ledger Hardware Wallet and MetaMask

To use Nucleon with your Ledger wallet:

1. Go to Nucleon.
2. Connect your imported account from Ledger to Nucleon.

   * Select the account from your Ledger device and click **Next**.

     <div align="left"><figure><img src="/files/QXPpGTxmKqfDH4LwZvU4" alt=""><figcaption></figcaption></figure></div>
   * Confirm the connection to MetaMask by clicking **Connect**.

   <figure><img src="/files/EmYPGw0TNFcElPNJGIYh" alt=""><figcaption></figcaption></figure>
3. Go to Nucleon, make a transaction.                                          &#x20;

<figure><img src="/files/9nujntWM48mR0CL2sMn4" alt=""><figcaption></figcaption></figure>

4. In the MetaMask notification, review the transaction details and click **Confirm**.&#x20;

   <figure><img src="/files/qXlONw6YQx7NJZ9Jctaf" alt=""><figcaption></figcaption></figure>
5. Now, plug-in your Ledger device to your computer.
6. Unlock your device and open the Ethereum app.
7. Review the transaction details and confirm the transaction by pressing the two buttons in Accept and Send.

   <div align="left"><figure><img src="/files/KDIZKhBDubOdHaOMfKrP" alt=""><figcaption></figcaption></figure></div>

You have just used Nucleon from your Ledger account!


# CFX Liquid Staking


# Stake CFX

By locking up your cryptocurrency assets for a fixed or variable period on Nucleon, users are able to earn a passive income for staking and support the security of the blockchain network.&#x20;

1. Click on Stake.

<figure><img src="https://lh3.googleusercontent.com/mDWcz5lt9B3Vr74B5H1Kob3xmQvhvbWF2e3_hyC1KeGGw9U-mbmjzccbORp-fuh9tdUlDLZYer4gnctyQjvKJZrvCJzXcKQPsz7khgYoAshjq754XjGAtLyurGEHSIcaJ5ZLXnW9Fm3pp40PkJDkSdjEBKwJs_wRk4QFMlJ5Kame5QZF9C7c9ly0fd1Ilg" alt=""><figcaption></figcaption></figure>

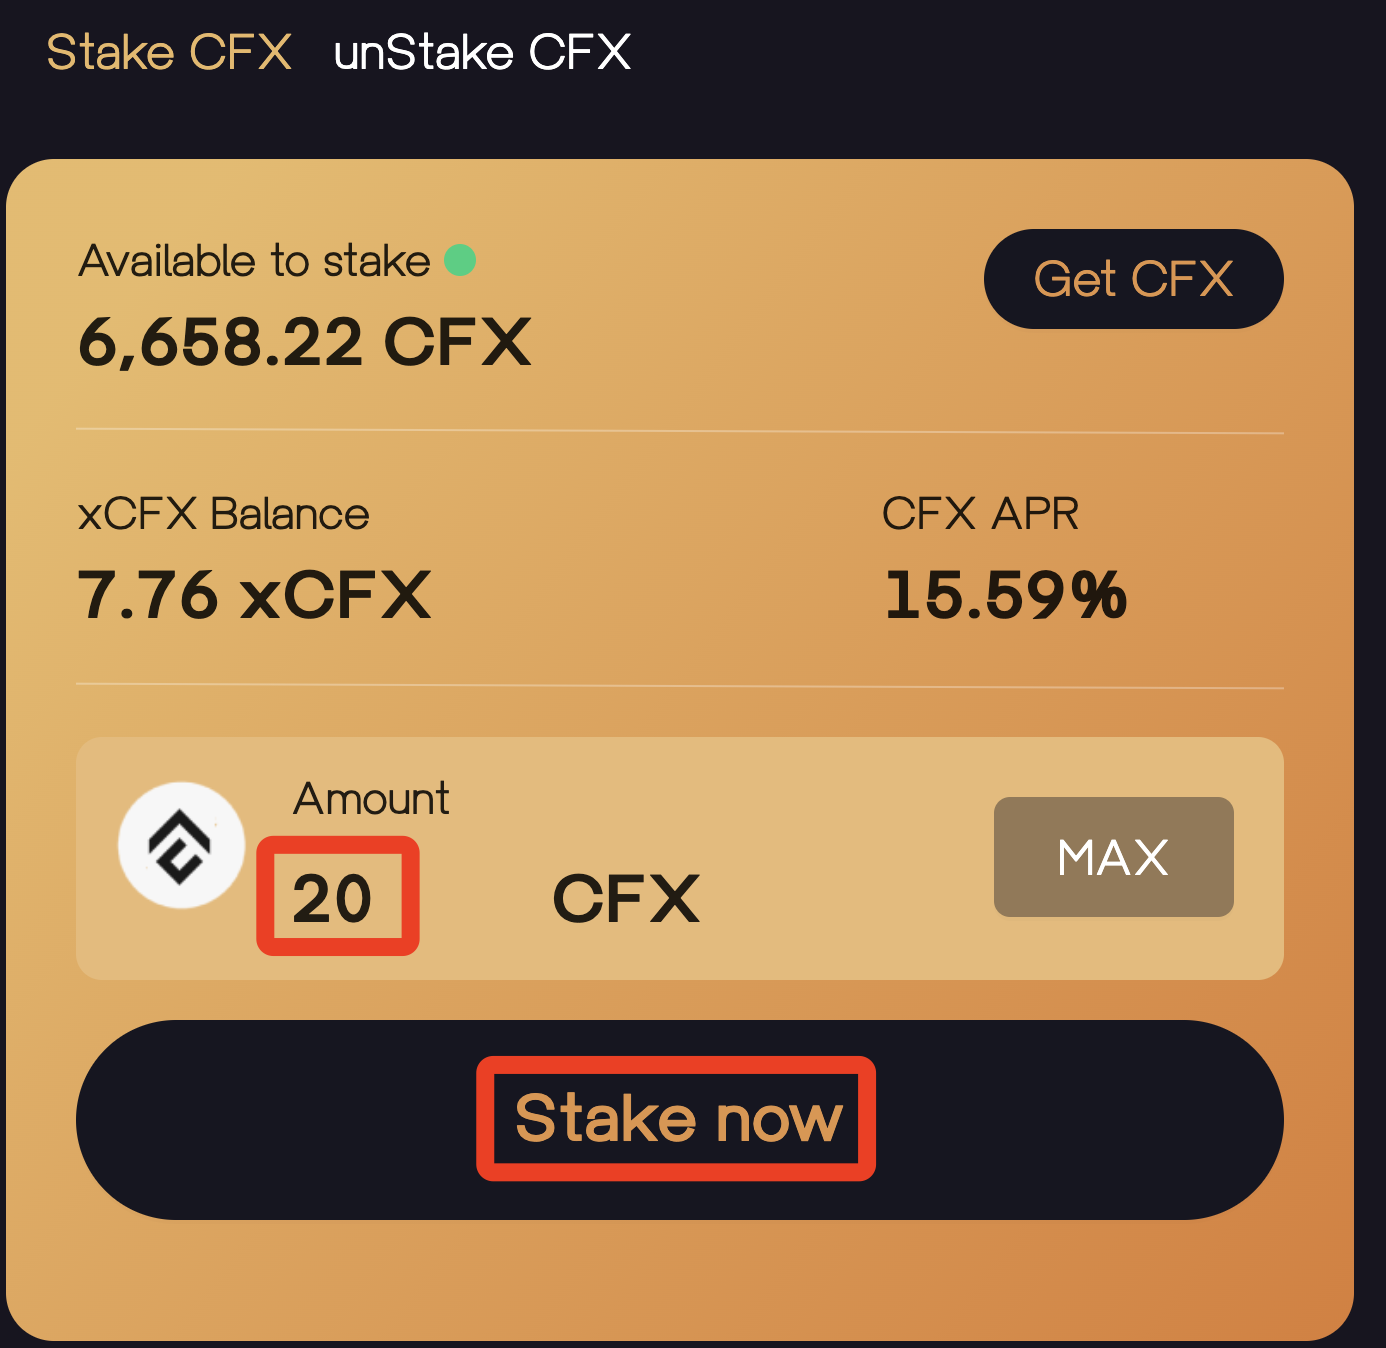
2. Enter the amount of CFX that you would like to stake and click Stake now. If you have insufficient CFX, please use the faucet above to claim.

<figure><img src="https://lh6.googleusercontent.com/_h9H7j2Tw8H50R1ES1BPKWCKdpe1RRf8cj0uhHgYqS3FdOIfnKaIqEEUj6A9sL4rK-nx-JpMwnWjrtKi_oqyGnW1I2t72jwr7B2WpTSXma81d-YSABxWNUS3rZKYIgrV9M6KaYMobuWqNcf67rM60lexkc9zOU_JYBKiTPY8IonhI4gBxM1aTjBQ5cCr8A" alt=""><figcaption></figcaption></figure>

<figure><img src="https://lh3.googleusercontent.com/gKBEcC58uMT9YCkosz8LMord9MMjo6_oDhq6aW77HAy6ljNRCd9n8sITiyDfrh2ltvyJ5cvzdy6DJfCPgsgH7uP6rO8bEaLRxxF3rzKI-jAUyF4v2CymBbcVPFnc9RrqgjYo4WHqH1TTBGRhFUiDHI7i-M3Su1U6okE3xNbyF14HJ5mAGAo-YbIIfSHE1Q" alt=""><figcaption></figcaption></figure>

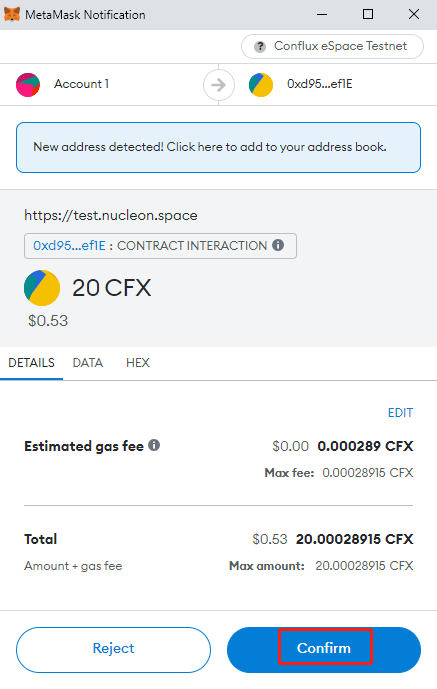
3. Check transaction details and click Confirm.

<figure><img src="https://lh4.googleusercontent.com/FHO3wosKq4Z0nSjygx1VGrcDnPvhDYiKE99yIySEcMmw17DBtNDkQFSF3lcD_WqOcaN2FIRaiJaHG5v0sricOrMQtYzOXd-Iy4mKoFa2NnzIu16MiZwBAT-ay_UX77VeOAgZKavEIJzoMnu2g0eN-Six1bbAw5b6VtyyAyn4fc4bhK7R9LoI4-M-jI5-pg" alt=""><figcaption></figcaption></figure>

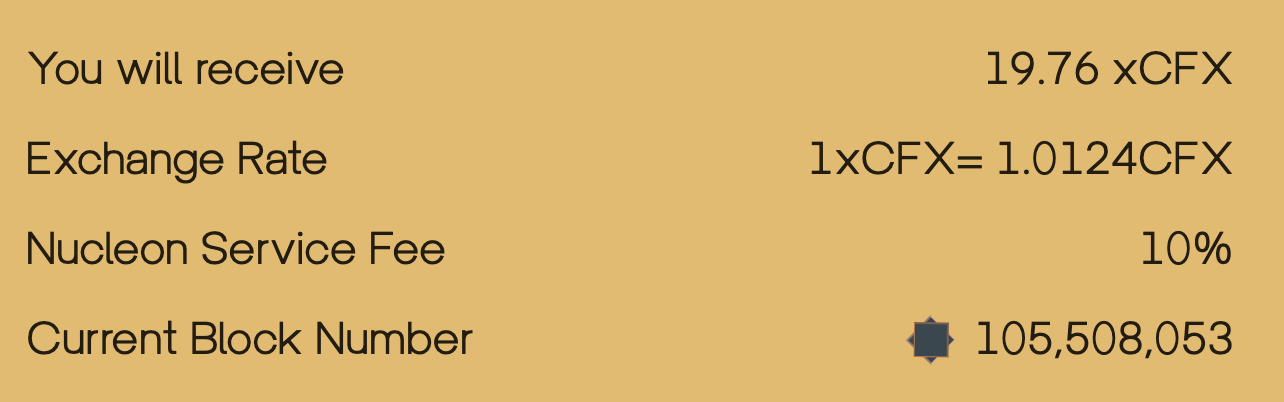
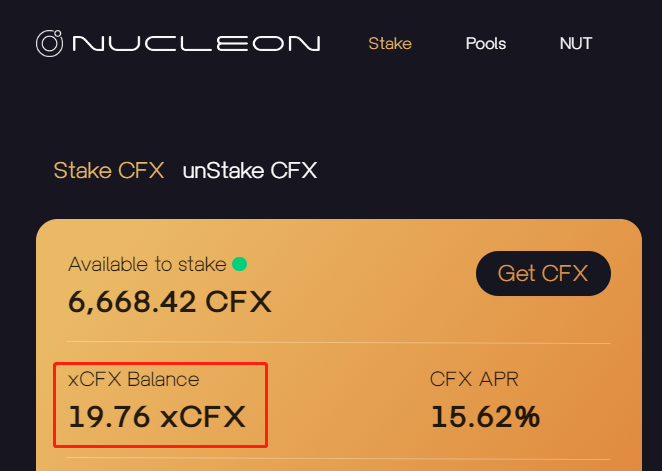
4. You have now successfully staked CFX and received xCFX in proportion to Nucleon’s exchange rate and service fee.

<figure><img src="https://lh4.googleusercontent.com/n5SDRemYcS1Py874syhoDEtwSoIqXWR_S_-WzhmOiyitcEIYQqw5ZIKijwVrjIbOpTyeiU8FNxNxY49X8f43ioCJFSXcs-jhIXg9-KWrSrvI9uy-sxsQEn7HVAyF2yA50-GmeSkiiYtBgCUX5Y2M5MzuVJbcosWTTzd_T5mpNmXTB8NvJdZWaG1fIlICig" alt=""><figcaption></figcaption></figure>

<br>

In the example above, the user has staked 20 CFX and received 19.76 xCFX in return. The difference between the CFX to xCFX ration grows as per Nucleon’s liquid staking design.

<br>


# Unstake CFX

Users are able to unstake certain amount of the asset that was originally committed to staking and this will be displayed instantly on your dashboard.

1. Click on Stake.

<figure><img src="https://lh3.googleusercontent.com/NengAjd58Z1JQPKn6xkwwov_ozlgOhYHTTaLHIsbTy9gOB4H-LjRSLHsxed820ZgdFZP5Tm8Nvq8u0MfcT9lgC23Fu4BgPJDgKdKZRQ1eRY0U9Oir2kDwo-NxGpKQgeJl52gBbLyB-2oaKcPFjAfql4sg0JmXEIyygAElJF3vquFXuRQZlHo6FeplYYi7g" alt=""><figcaption></figcaption></figure>

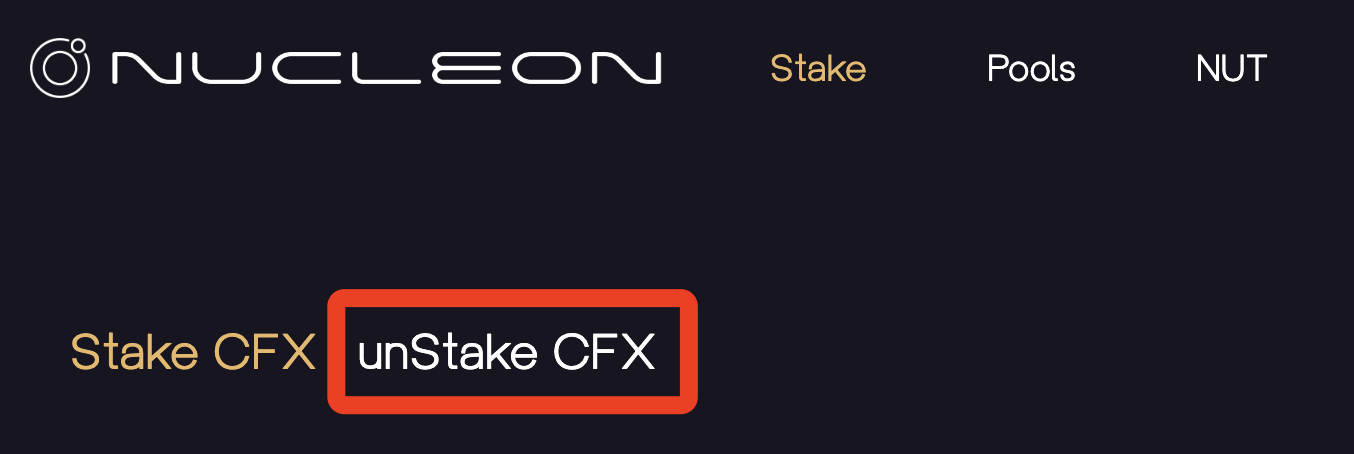
2. Click on unStake CFX.

<figure><img src="https://lh6.googleusercontent.com/vz7z1xk0k06j6cyyc6po1VB8R2ifJX4roH_xKCpvQHMl9p53BSChzwE4OdrdOPw91QxX4I2QbyEISk1GGIDbcxG0vDIYl7FWoxCdxPFn-rf7QH0aNhvfFhdF47BF8SXY9h0EtTdcnxEMGwEk-Ta6Pn4AYHX_tBsoepe8OzGycJZd3HPhhPQhFz1caHixWA" alt=""><figcaption></figcaption></figure>

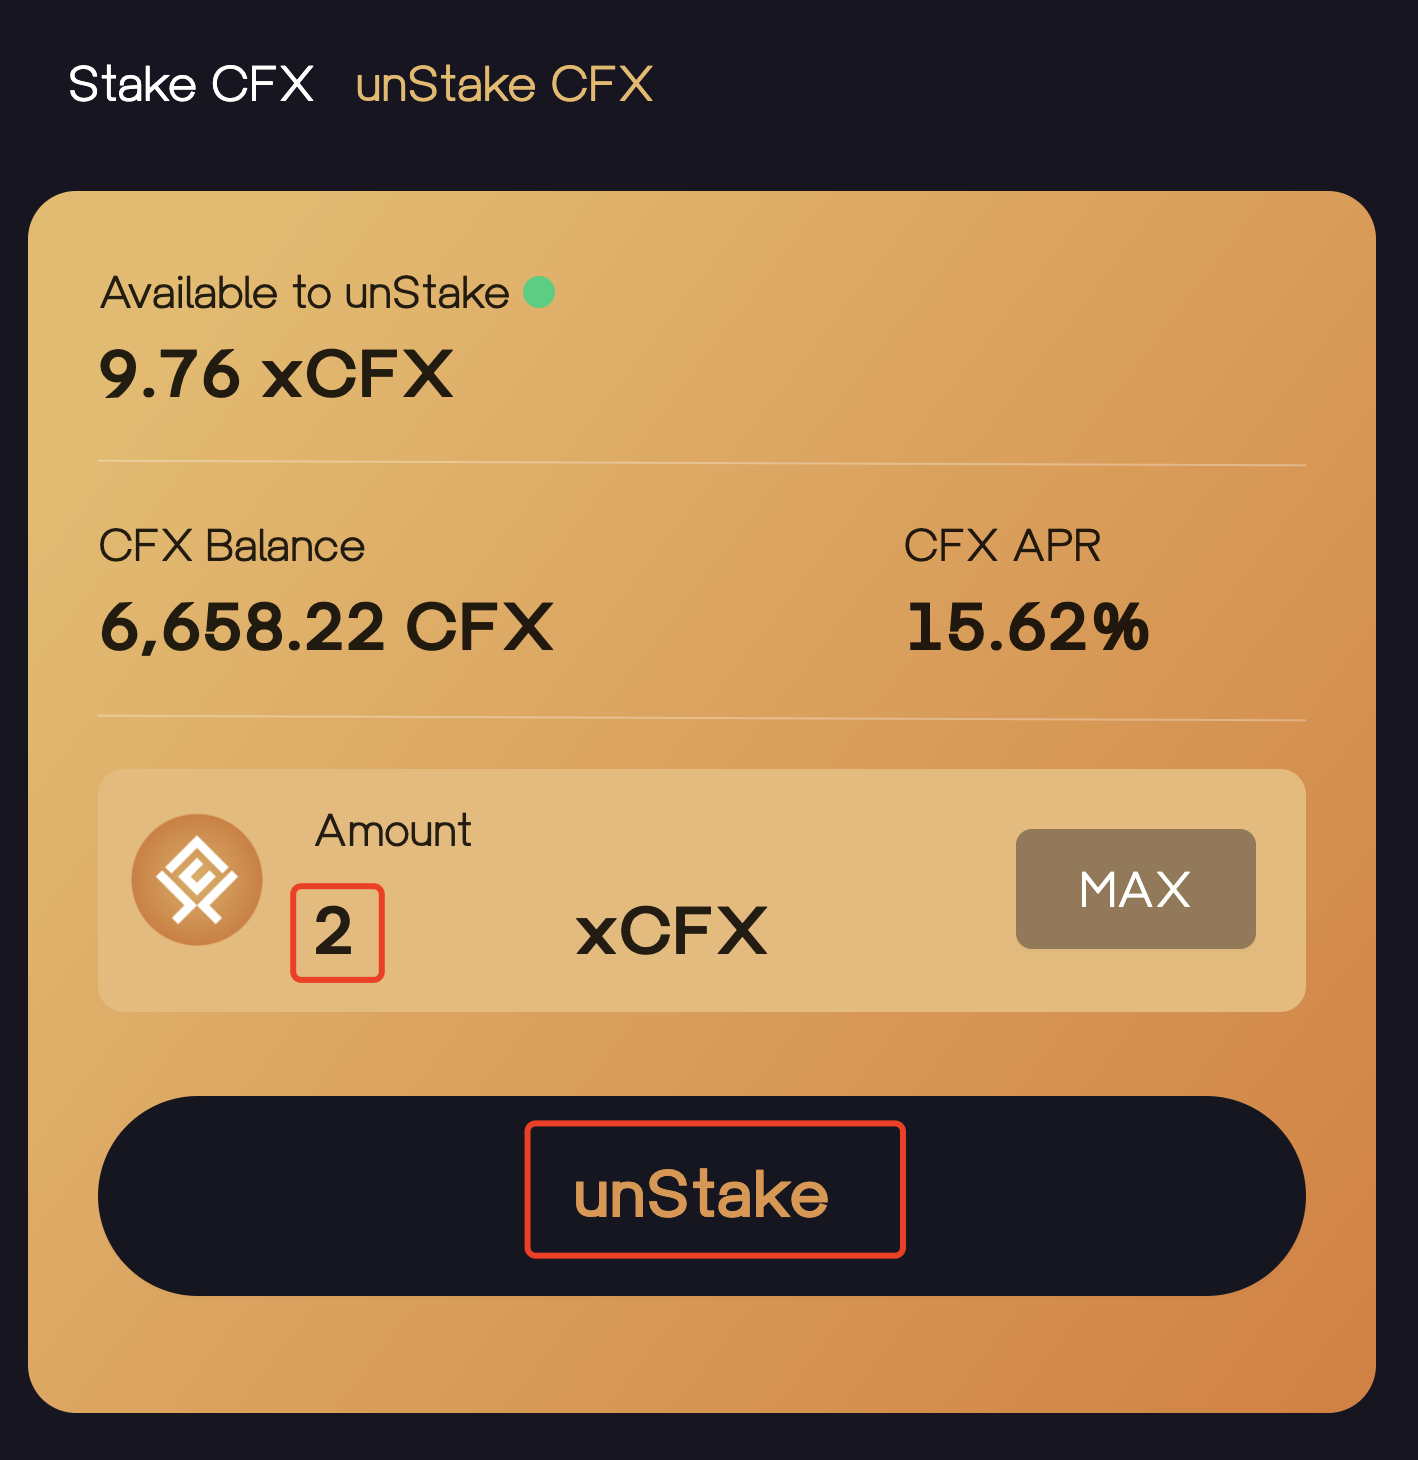
3. Input the amount of CFX that you would like to unstake, and click unStake.

<figure><img src="https://lh6.googleusercontent.com/mCLR5MfVBxk89GMWwTiYgIqBdYndWZXpfivACp64R5Umix30EaTa27zMlZYqNJdx_iVIg5FS5w3I0_GvMRwOsh3DBpgPcqt8xq3COWBB_1UH6TllbGUzrXpGnYMod63TxcqFfB0Qeu5JWD1sCu8e1iFWzazSWL82Ln7XbP7iF5hjdQ66nKGLvSiqwrJvpg" alt=""><figcaption></figcaption></figure>

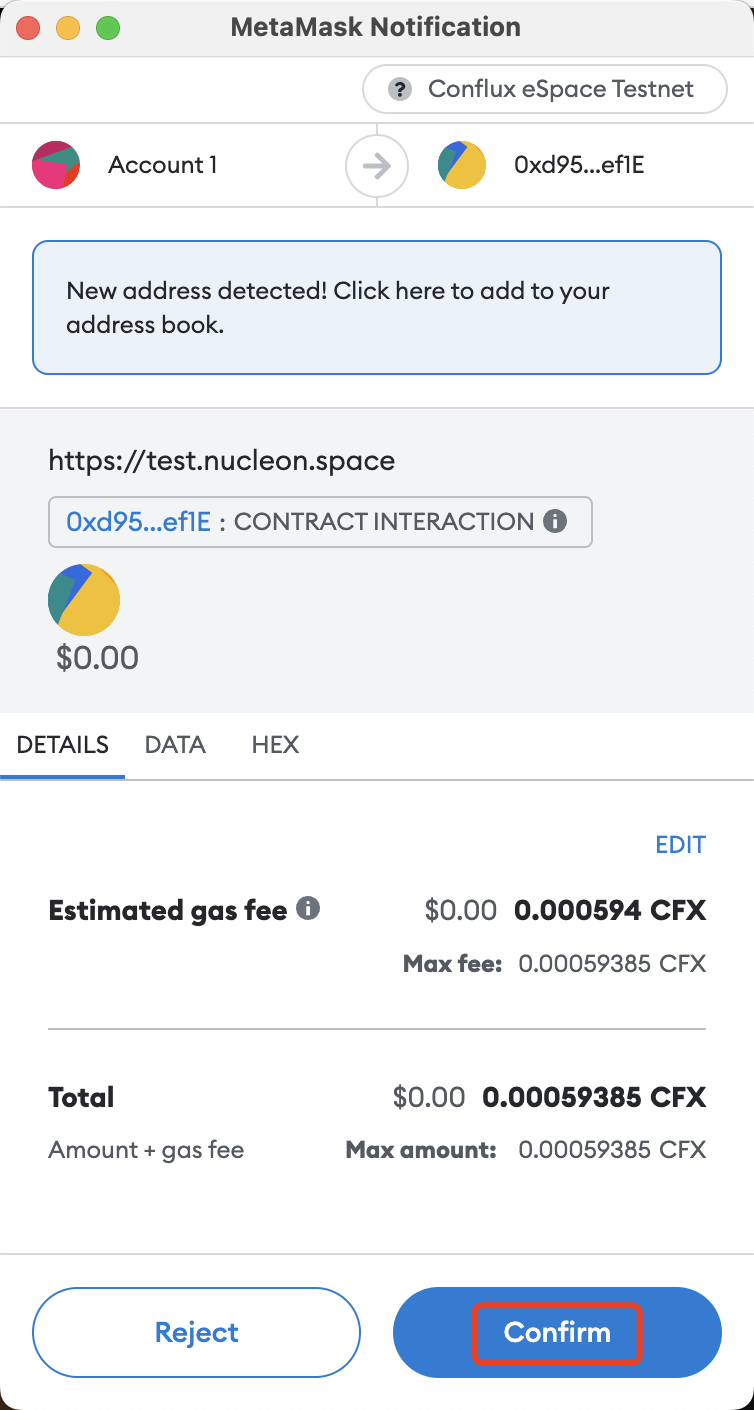
4. Confirm transaction details and click Confirm.

<figure><img src="https://lh6.googleusercontent.com/hj0yapoBm7nhAZQiHuLxhzBsIdWGgKjpYCaKBP1R_X5saH6fltPb_ldZv96M_cMOxnh2OvJJol14L7E4ZCUNatWpx9Iu40HF9U4Yi4gygxaP7eu4ICkw7W35iOyH0W6iYoDQ37Dk_FymXxqj_EPGdcmNYaGtgjIKOfCV03Qj7tIb8e6nkXQQbyW_GR1Ezg" alt=""><figcaption></figcaption></figure>

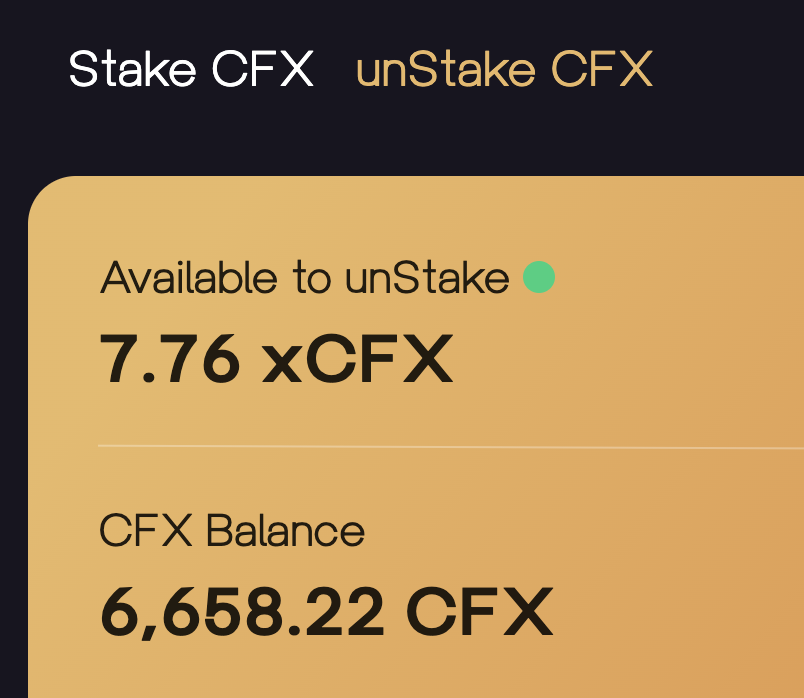
5. You have successfully unstaked CFX and this can now be viewed on your updated xCFX balance.

<figure><img src="https://lh3.googleusercontent.com/Hci2OGBI0t2mOYimwWG2rx92jYZBMR4creqE0d4pbgQEoxaidLN0tQJGvU0zmEjnhKNYvi-xW-aLEpql2fwP_URSP2ZM9NojlYsoc3-v3Zs2yZ-qeF4bydyjnyr1UFlDyCjtEtt1BcUvemERwiMt2RiwhhAZ3k_csEwu-GZilT67W_40_WylvtLvANW4gQ" alt=""><figcaption></figcaption></figure>

<br>


# Claim CFX

After unstaking xCFX, Nucleon obtains the corresponding CFX from its PoS pool for the user. The unstaking of CFX from any given PoS pool depends on the staking design of Conflux Network. The PoS design of Conflux Network requires a lock-up time period for staking and unstaking of CFX into any given pool and cannot be bypassed, read more [here](https://docs.nucleon.network/about-conflux-staking/about-conflux-pos). For this reason, Nucleon has implemented a 14-day unlock period until the user can claim their unlocked CFX.

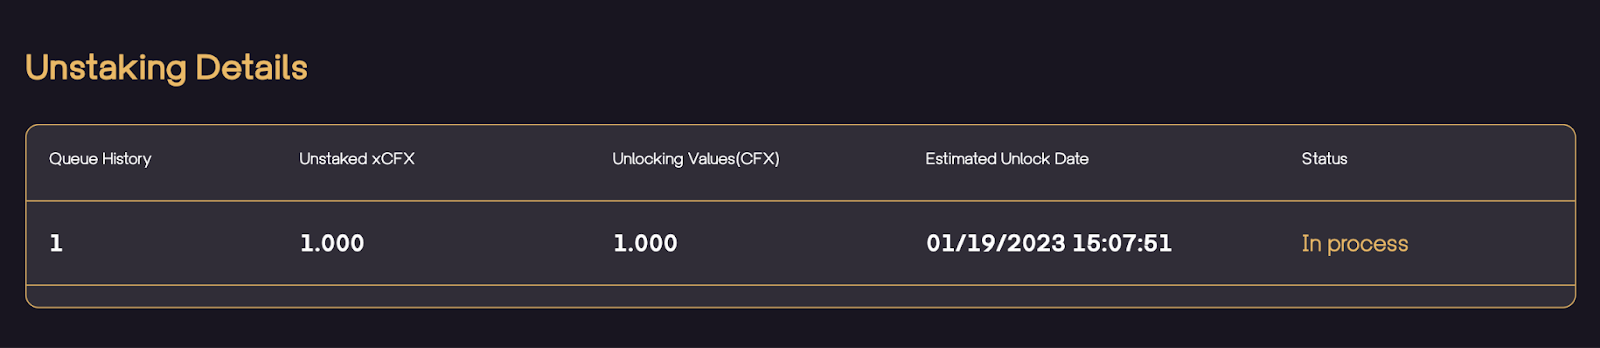
Once a user has successfully unstaked, the user can view their unstaking transactions and their process at the buttom of the unStaking page:

<figure><img src="https://lh5.googleusercontent.com/O32ldJCyYGyotMD6jKbkaqU5SZHUxZwyyWG0IhM4c0a3iyPT-yudTRjKWYl-iXvZqG0w3gwNqiT043imYGkwD6nrZqIiXX0i4M-EIx67Evc7NTA_uAlOlklssbfivXwOmIbQ3PpPGgvDVB7rh4ZAb4Pc0_hnI5slgr33u6O1o-hW-feGSqxhWGoMAe7VMg" alt=""><figcaption></figcaption></figure>

The image above shows the amount of xCFX being unstaked, the unlock value of CFX according to the CFX to xCFX ratio at the time of unstake, the estimated unlock date when the user can obtain the CFX, and the status of the Unstaking.

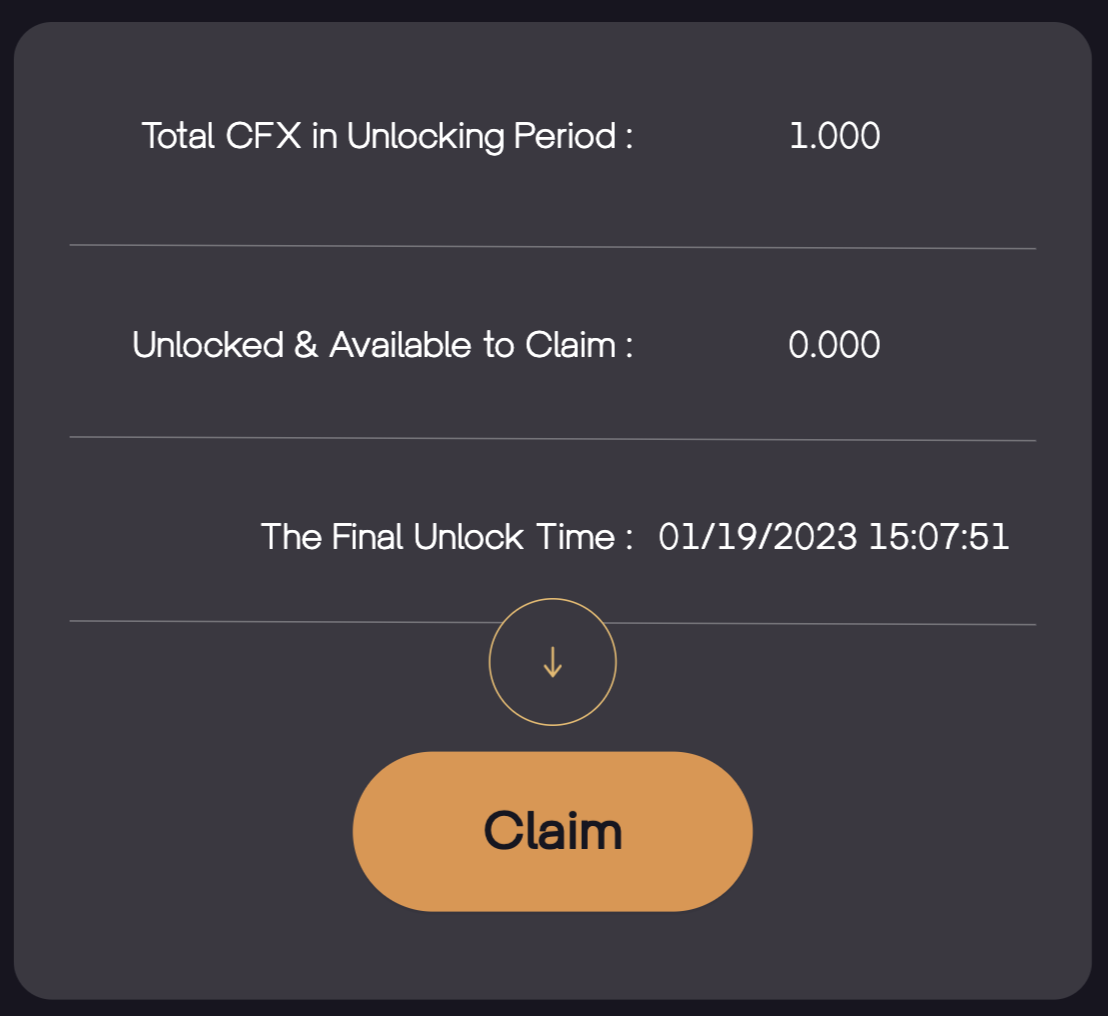
In addition, on the top right of the unStaking page, users can see how many CFX are currently in its unstaking period of the Conflux PoS mechanism, and how many are already unlocked and available to claim. See the figure below:

<figure><img src="https://lh5.googleusercontent.com/ly7CJjn3vOkIKF4yuV6-bAkGeKiPtZMEVdXlI0ZhFHdY-R8_xxzFigoQ9N_ueeku-ueMCrtqKaEkcb6y5XYjgL9z4PFVgndDc6oB5mmjcQD4TYhbU1Q26rW0c-3EypmooCikN_Mi9cMQfC_ydwDb84J-VwmZJjOOrTUiF8opfq8j2cGwdy6sA6102YJCMQ" alt=""><figcaption></figcaption></figure>

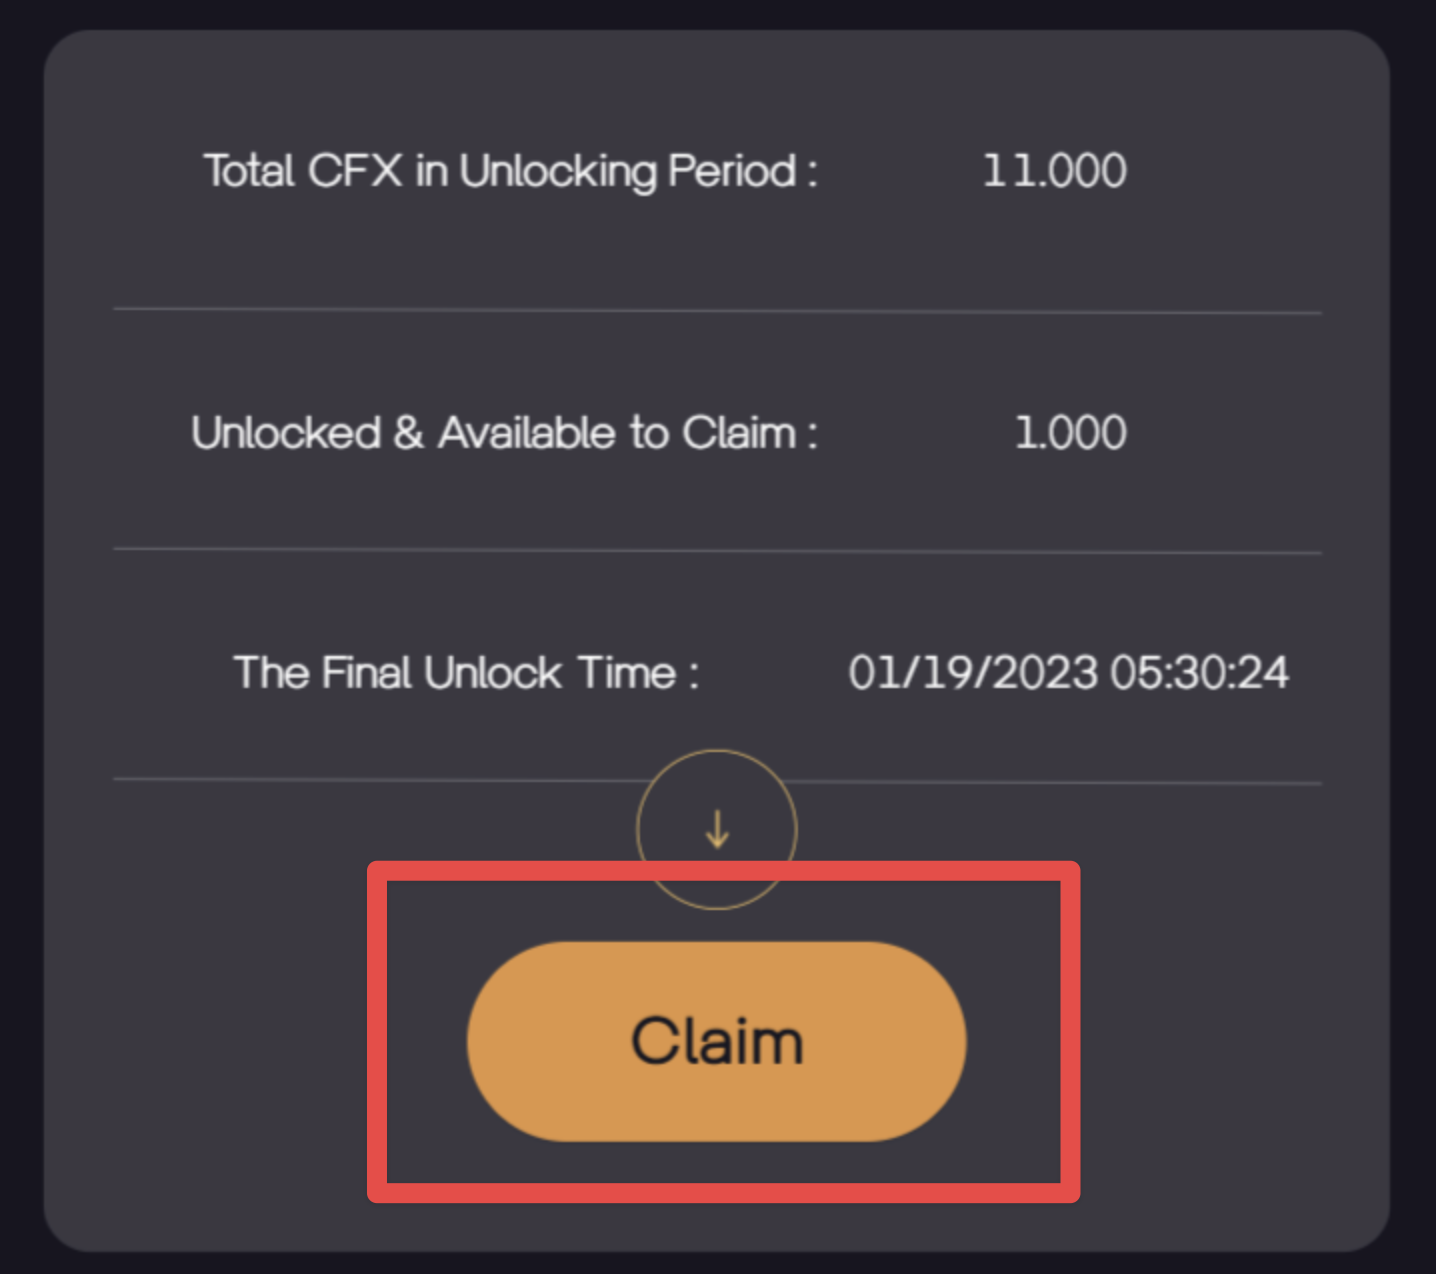
Once the CFX are unlocked and available to claim as show in the overview field, you can received your CFX in the following order:

1. Confirm that there are CFX unlocked and available to claim in the connected wallet.

<figure><img src="https://lh3.googleusercontent.com/aOVHkRvQWgaN4OI9mnIFULa7H6mw7TvFlnZnu923ILuZ4NuZFypkdVN2en8snba8u0qrWzYPuenId_ZSjhd6D8qsP67b0nA882fb9SNkHuaaaaINWUhaEgHXkvpgKM4Ot1EgsaLCX9v27Sqcx_z16oHuDouHdFIzV1DltNzM21hNNKTP-3_pBZN5GJt1Jw" alt=""><figcaption></figcaption></figure>

2. Click on Claim.

<figure><img src="https://lh3.googleusercontent.com/Hlao_vG80iml-XoGwTnqqTPPb2ZJhU9bfgi9b_-wwc2EY0dhjIQlEVd0HlfamLqKEKWYs1pk26_8eos_U11dRB_KCs-gPcA0Y4jSQGIBHD_kXc6erUptRg5nsPne4xVLQ-ux3S-YV26iUJv9mm5UQjfEIgIkkx42WU1QhfXIDkE_xpwI3z48_mb-8obFuw" alt=""><figcaption></figcaption></figure>

3. Confirm transaction details and click Confirm.

<figure><img src="https://lh6.googleusercontent.com/hj0yapoBm7nhAZQiHuLxhzBsIdWGgKjpYCaKBP1R_X5saH6fltPb_ldZv96M_cMOxnh2OvJJol14L7E4ZCUNatWpx9Iu40HF9U4Yi4gygxaP7eu4ICkw7W35iOyH0W6iYoDQ37Dk_FymXxqj_EPGdcmNYaGtgjIKOfCV03Qj7tIb8e6nkXQQbyW_GR1Ezg" alt=""><figcaption></figcaption></figure>

4. You have successfully claimed your CFX from the Conflux PoS pool and this can now be viewed on your updated CFX balance and in your wallet.


# Liquidity Pools


# CFX/xCFX Liquidity Pool


# Add CFX/xCFX Liquidity

A liquidity pool is a collection of digital assets accumulated to enable trading on a decentralized exchange (DEX). Users can add LP to earn Nulceon's Governance token NUT and to earn trading fees. In addtition, as the liquidity pair CFX/xCFX has a steady growing ratio as per Nucleon's liquid staking design, advanced users can also explore arbitrage opportunties to maintain the correct ratio and earn trading fees and arbitrage profits.

1. Click on Pools.

<figure><img src="https://lh3.googleusercontent.com/pZoh5wjLcW-czM5uaOZ0iGacpKrM3ongAFLiXkVWva9gLlxBuyttZGHoFJ7eEFIXXdr3D9tnKXOewaR4URVxQnglCcl0VTcjPj8_wdRbtMwH5zols2qNtIFcJM8tGTH9ZWLU7Tb7fpp8MBM-RStl6Gi1GbyRqfZZbogOA2kh2OYOEpHmGy4BcCDIJzBiOg" alt=""><figcaption></figcaption></figure>

2. Select the corresponding pool that you want and click on Add Liquidity. In this case, XCFX/CFX.

<figure><img src="https://lh6.googleusercontent.com/zjdKCk7vx6LGos5Wlz9On8sgbcU3EOHPeJAxtuEWNKIT5bgpU6xru_EzdRMVSjJqP1qWDINMfzq8RZAZCG8K3jYeaBZFTz9iartCs3Jst2tbHAu5bWXO9K5fdfoeVDb-dgmw5iwxFdvaTJp_N-zdy-EMo3EXqQrmO7m9kRVH9RPjn08thHO6Hng4lKWWaA" alt=""><figcaption></figcaption></figure>

3. You have been redirected to Swappi, and now click on Add Liquidity.

<figure><img src="https://lh5.googleusercontent.com/Glm9GGZgZiap3FuZaV4y3EiewCZANEPZcBhFCHMWf6MvcGdV8vs0vrrRQIsKynpkN0mdwDdhpHvYdbBhncvBVsepXxwXRbXJ6PhziaHz_wnA3ibLymki6N7D9Rn8EOACr0IqFFzkl8hQdENgYR4kYBFUa8cjxDaHuniq-KINW7Ew8X3HAXOZDDiB06ZKJg" alt=""><figcaption></figcaption></figure>

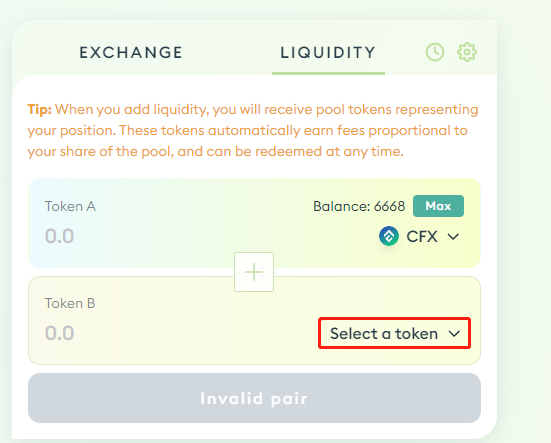
4. Click on Select a token.

<figure><img src="https://lh4.googleusercontent.com/ZWlGULgUe-liX-6-PhM132PItmNgXns1fuTY8448pJoukuI8VEWhmUqx2fX6B9ZBpP3XT9s3FEjoNZVq3mcftzfAp5DkG3jnTvtBBEdPBqpy4V8idpQny98vPHYH7sf7nyqcwBAKPIXZU8LdjziCLjDsNXvOLBnMDUesOeEnat3Ds92_JkT4RhFdjxLpRQ" alt=""><figcaption></figcaption></figure>

5. Input xCFX and add the token.

<figure><img src="https://lh6.googleusercontent.com/DDNRxp7KNCbBATCj42SK0sRFCUNwZMzGe8mTHB_3cPh9AAYsFbqbSsbvpZP2R3DrV8L6nAqRNIoxDGcn9yEnJQaxCgngJQilMnmgjo3Qe8GF0a8AW5mjbOtG6cY1vrxzOV7QPWU7RpPglDrSoVRCYFMJNni6ucGPVnUGbZ1uzM3KdV829tSz4qu_yn7Mng" alt=""><figcaption></figcaption></figure>

Note: If you cannot find xCFX on the token list, simply paste its contract address.

xCFX contract address: 0x889138644274a7Dc602f25A7e7D53fF40E6d0091

6. Enter the amount of asset that you would like to supply and click on Supply.

<figure><img src="https://lh3.googleusercontent.com/ZX_8aZkEwxPEzYR_r1veSQ9ZijkqAHZSixtJGZYAeySbM1uOd8Mvc2cs30ah9-xJKYzrNmDVggaWQdYct-yvJ_7m8zhvg4a4A7Vt2ISYVz5SRXy7AjtRNsooh6GJS6AYkklX8wpS8wsEQzO7wjFb0ChLR8G2-Gnag_EDSd-NPv4mWZjdo27bi1QpbyRusw" alt=""><figcaption></figcaption></figure>

7. Check transaction details and click Confirm Supply.

<figure><img src="https://lh3.googleusercontent.com/Np5PWmmB5IO6zGcnnPFkF6DPitual6cvhgEkydfg1k6QLo-d7sudaxRbj7-YH_ukxYaep9fKQPIyAh-_AJlPoTE1GLcRl38GkkFViKFj0GTm0e5AXFbUN_IrExK4udL_Lkb7cnfmkcw0DLY-h4WX3h-hA3w9cQnJZzrXwXWGY1k4vmUC1MTnNR-pTUxnVg" alt=""><figcaption></figcaption></figure>

8. Click on Confirm in the MetaMask pop-out confirmation window.

<figure><img src="https://lh4.googleusercontent.com/a7V0b7Lq6_g6pZvfztCu4EcQO23segBuVUZGjvMv0B090_WryTusHdV_ocW9tH-gVlcBXOb64Po3nzr4Esw2uIKs_6Yw40H8uugbv5-gM2RnYkF-a9ZkDI2ZEGM77dctzTB2HyV5J4T4I_rnrT-KL6Uu9LyEGrEtJE_Otwr5iLQN3hhTxTK8un3eC-gNeA" alt=""><figcaption></figcaption></figure>

9. You have successfully added liquidity to the liquidity pool, please refresh the Nucleon page to show the updated balance of LP tokens.

<figure><img src="https://lh6.googleusercontent.com/TZDNzubMa9Yr8t_kxrew7h37qGB6zqRZQTX_21wwUDysKFDfySKg4ybWzzNNrgT2pwlsrygVrmN5aLBzbQdTZ1greaeaaSzHqtSUOJ2qzx05RfJ8qP6oiCMynnpfiGTW4lzmW40ZEgxPuzBTQ5Y1ePWqcH-ar-oLC56AWOP_3glExOiE8WiZeov7kEKsig" alt=""><figcaption></figcaption></figure>

You can check whether you have successfully received the xCFX/CFX - Swappi LP tokens by adding the LP to your wallet.

CFX/xCFX Contract Address: 0x949b78eF2c8d6979098E195b08F27FF99cb20448

<br>


# Stake CFX/xCFX LP Tokens

1. Click on Pools.

<figure><img src="https://lh3.googleusercontent.com/mPBoh41sBBFlLqcqfljm3QrWkTWfDuzeOwoRXTmyAtq5_qrNu9tSxvrkoFQbBvY-rk5J8wji8vCaWKy0abtlaiLXkThmvmQ39mUY4O9FgdEWwzSbJf5MUL2gC4pcvDqWlYJxVZ-WzHkMGb3F0sfvElpvPbIolIeL8D-2V1EITfMdJnEsR7AOGdSjgNmZNw" alt=""><figcaption></figcaption></figure>

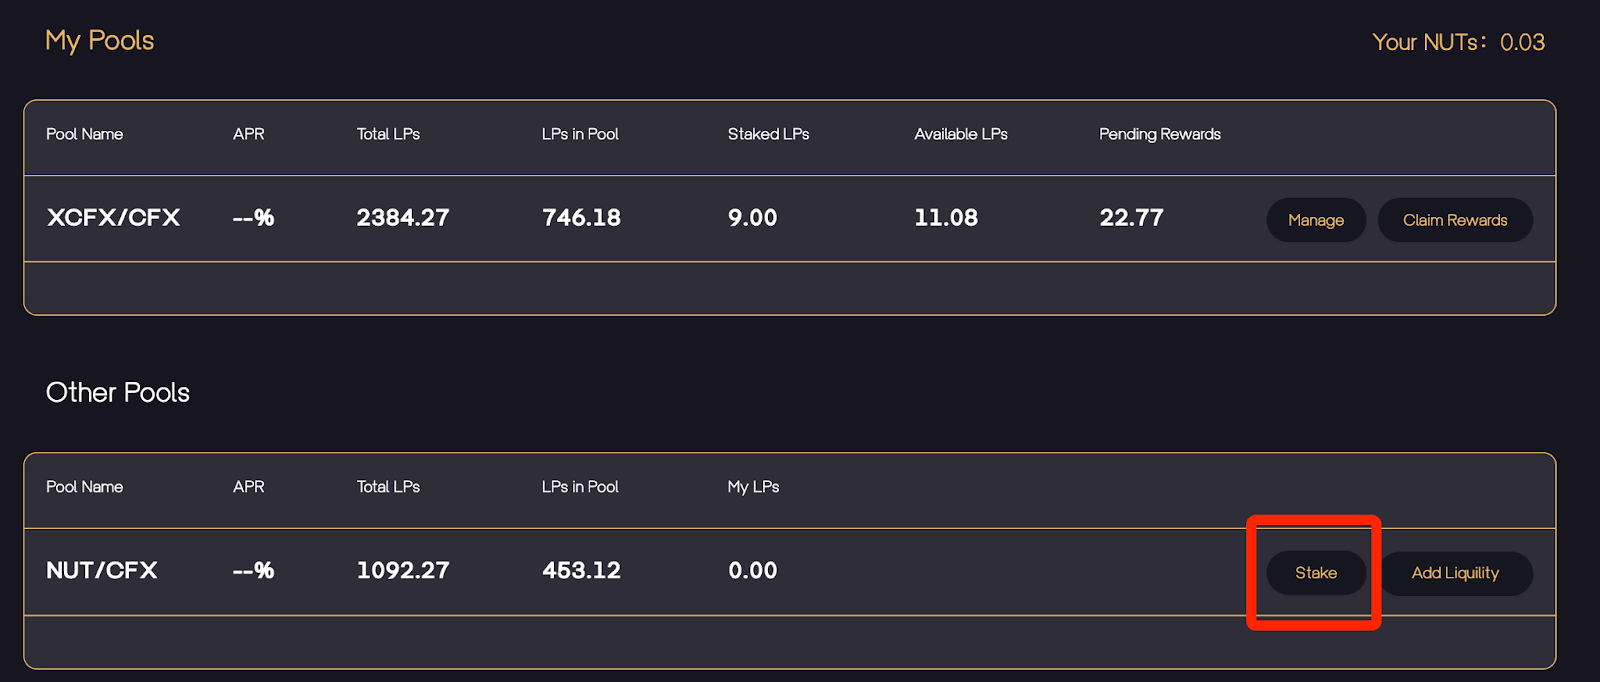
2. Select the corresponding LP and click on Stake.

<figure><img src="https://lh5.googleusercontent.com/BmRLzSx9ISxUs1O_kqKAYNLWYUYDh3v0n6kRYZNpwLnmYd7yaAILZEd3ximTZaxE4oU8eG4ogBuKiP39wuV1Sci2onCnRt7XjO8IDwK-pNDef-ayQMYWYn5aXRswinF9yjDQrWb_FkGn8CtlG54uvtyH3Qq1ffamDKDfw16a8Gk1tIwApaBhQDHT68xmtg" alt=""><figcaption></figcaption></figure>

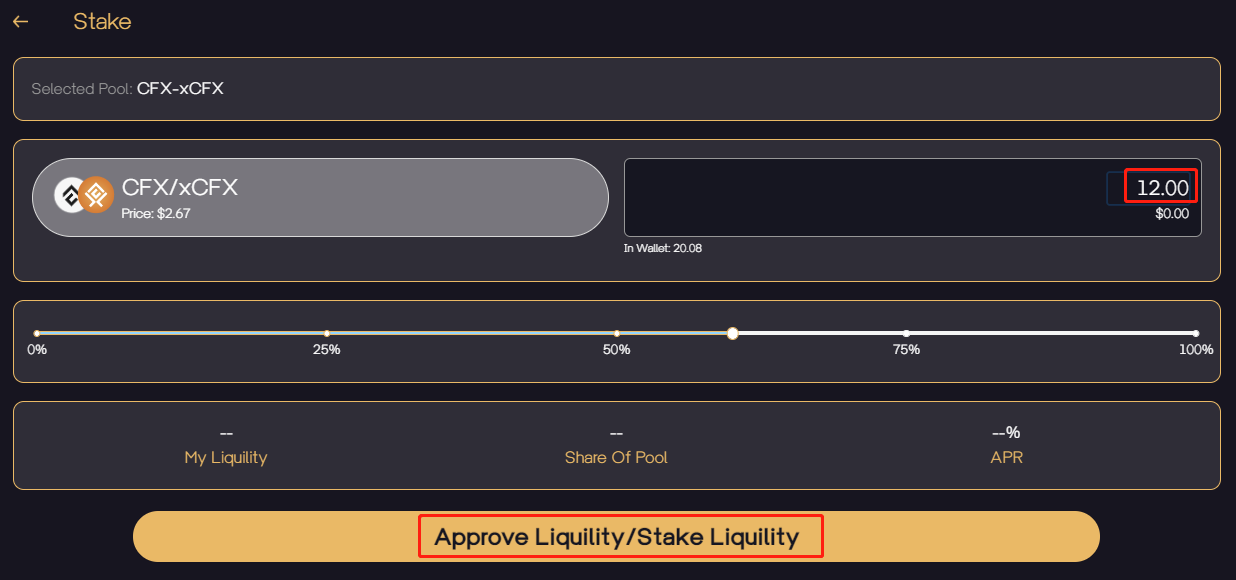
3. Manually enter the amount that you would like to stake, or simply use the slider, and then click on Approve Liquidity/Stake Liquidity.

<figure><img src="https://lh5.googleusercontent.com/aEqfPmDyQOcSSYeex_7OMTbDwO42zddPHOZfZV24qP_nawo_f1RVOcdUO1pGTxd3PwDbi79Dmeq4U5g8-0Jn7ffyQllEOtSA01AtGCXLhkq0_nVY98t1aqr25yeqIHDOxnipANTJ2QjkUMJcXZ562H2IwV62n8cLPEtVfsqENW7zzO23FX9oh11izbkMww" alt=""><figcaption></figcaption></figure>

4. Check transaction details and click Confirm.

<figure><img src="https://lh3.googleusercontent.com/VUcG-spvnbEUeT2DxhqS_S1tJTnpprJwyIUvqgNBN8NIKzoQy2tBqkv4GPw9MlyxSyCueLX0Z6K65njn3574ikAcAIAF_I1AnkZ42DzrxZ3cQjRf_T6PpaOBBT8oOtA2Wn6A_oQGryutq9ihse47YEW07fEjeC4V5bZ6JNC72JnOqYvb6CXWqDOMAa7psg" alt=""><figcaption></figcaption></figure>

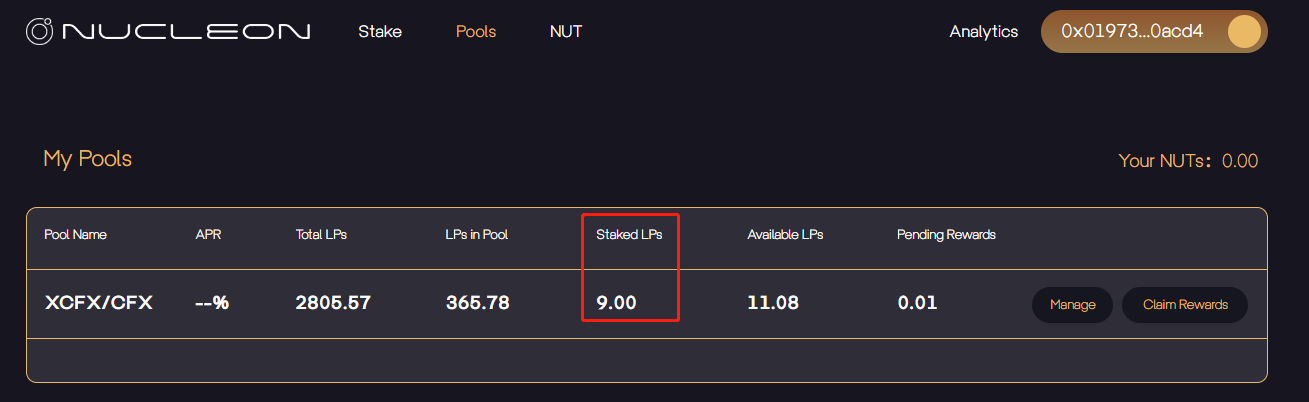
5. You have successfully staked, and this should be displayed on the Nucleon page.

<figure><img src="https://lh5.googleusercontent.com/DNhTHa1bZiUNjBrrfxNyGsRrB4OQjGM2belUVB6uvtDS0gzw7ibTro1yPrd4nagw_XokpFOGOpmYj7aRj9Cl9RCm8Yo6NYYofUcGvk6KGazKWHI5Q_VQcbFVwm5UQribb4QDTrZ814TXNpLWbU8KVJkMMJxOt_J6b7Z8Bdh3d8oAiN915bhZDiDUh-Ypfw" alt=""><figcaption></figcaption></figure>

<br>


# Withdraw CFX/xCFX Liquidity

1. Click on Pools.

<figure><img src="https://lh6.googleusercontent.com/7323vpiZab0ETiDXKM_01D8VDEOfeM4IiJLlShnP8xgKzqPgSG8v0bA8MBBYVXLqKaDZekNUItNRbr0MpmE_GR_YA20grw99CNOk8JZ8rasdtMDDMxrn5aelDUyzmwxTR8ErgwpoZ5ZFbTz6J_wwhIwxk9mMgLOEJS34_A8F2w3aeG3WDw5zAebzIXXLcg" alt=""><figcaption></figcaption></figure>

2. Select the corresponding LP and click on Manage.

<figure><img src="https://lh5.googleusercontent.com/-HHf8lgK---MA8uHiKcNEe8046a3JVJQlF5eprtDPx09DRRO1Vz8vfeWaf9hZGoy6DiP8Dd_Wza_a8MsQtdJ3i0DzXxIA-FU23Y7Yg89HOtqW37B0207B2dxaL5FcnrbkJF8UZZScVD1-QxgUHWITruplY6ZTkg75DEEbKCnMcAKStLJcs3hgSJeSiDl_A" alt=""><figcaption></figcaption></figure>

3. Click on Withdraw.

<figure><img src="https://lh6.googleusercontent.com/OpHhFlyQCQbIy_PonkrAIFAJex7TQr3cwKTclvJwqsLaB8ZAyZtzlqH47_4XvI2IGvrXz08060AGrBaroC4_uiPYQ2BULLONraqmUqgUIVAjauoGmBGpF7yjamucldLruWKujP1pHv7w5swBhVvohFAPNH4wYTs6X9SGc80xyrI3mcXPo2O4J1BtSww0Aw" alt=""><figcaption></figcaption></figure>

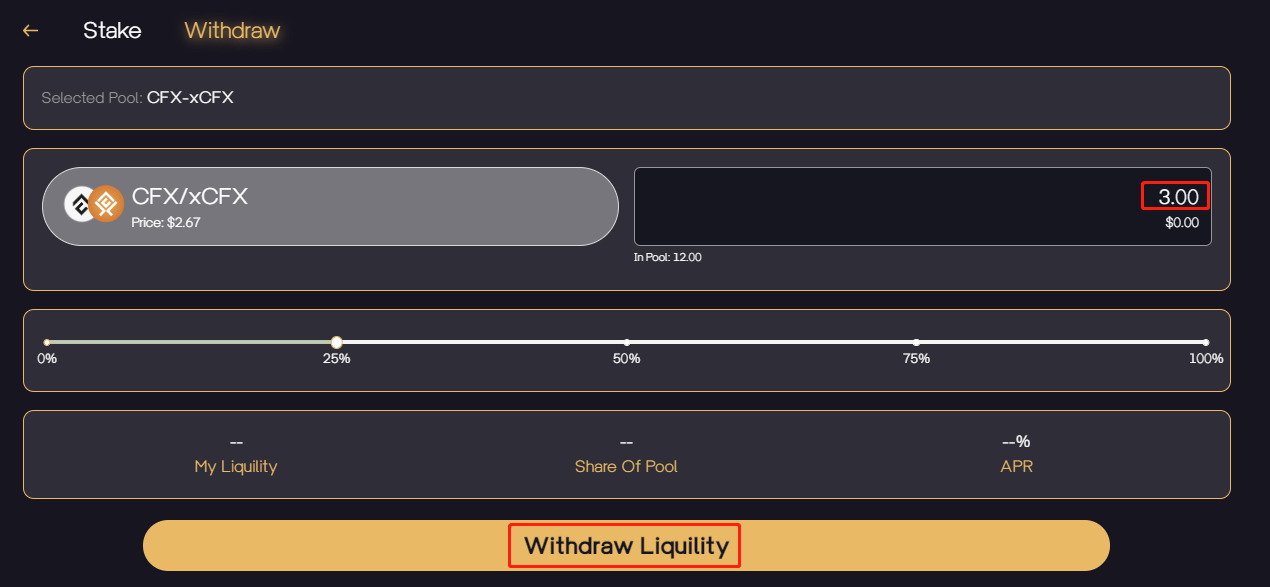
4. Manually enter the amount that you would like to withdraw, or simply use the slider, and then click on Withdraw Liquidity.

<figure><img src="https://lh4.googleusercontent.com/SGgu3W-6FbSPU8YcTa0lnYXzN6z7LMgPHMzAaZRtx3ZyBoXZggoaucoEsD7bXv_PlVCjG8GCV84aC1Y3pNyw7qy-21Y1uc7A4TQNPq2s7xvTXQIqlEoSQtrpJ1yVmS4yET3QDwdbC6I821M5t2Iuo0M-n_zfh9ZVF9TXlr0FsMweoRUgQiH6A-Adt_aZvg" alt=""><figcaption></figcaption></figure>

5. Check transaction details and click Confirm.

<figure><img src="https://lh4.googleusercontent.com/9K9y7qU-t41N0PFViSNe02B0UU88KhkT76T8aOfVuhj7lwbgO7Hpm8-TQ3JtYK-1q8bgi-xYsRYj5lpRj7M7ZfJq99rg3U_m1MOoXlVq02L7ZFS1VyzAKt4_IFkrrt7U4m61pyO8fvkrP2mgE_Y-F3ANuCX0plgC3SPPAhIEzd5fqQN6KF3vc_-g8m_xQw" alt=""><figcaption></figcaption></figure>

6\. You have successfully withdrawn liquidity, and Nucleon will now show the updated balance.

<figure><img src="https://lh4.googleusercontent.com/IO2ESUD7cjE5KUkMYOFRTPsBpHqM07svXsynKLafMYtZB3Daop8tE2mD7euZ_tL1VAXiZaCkI9ACUKnLw9dbkwYVhGth8zrt_w-0uiH8teEHaGrPpdtgq69kXRkK_2L8HvkJ9-1BkNTK3CtGQXJDK5u0mqF919k9AzijaAjDKV0oC6rEYNCl3tF3F7YK8w" alt=""><figcaption></figcaption></figure>

<br>


# CFX/NUT Liquidity Pool


# Add CFX/NUT Liquidity

A liquidity pool is a collection of digital assets accumulated to enable trading on a decentralized exchange (DEX). Users can add LP to earn Nucleon's Governance token NUT and earn trading fees. In addition, the liquidity pair CFX/NUT has a steady growing ratio per Nucleon's liquid staking design. Advanced users can also explore arbitrage opportunties to maintain the correct ratio and earn trading fees and arbitrage profits.

1. Click on Pools.

<figure><img src="https://lh3.googleusercontent.com/pZoh5wjLcW-czM5uaOZ0iGacpKrM3ongAFLiXkVWva9gLlxBuyttZGHoFJ7eEFIXXdr3D9tnKXOewaR4URVxQnglCcl0VTcjPj8_wdRbtMwH5zols2qNtIFcJM8tGTH9ZWLU7Tb7fpp8MBM-RStl6Gi1GbyRqfZZbogOA2kh2OYOEpHmGy4BcCDIJzBiOg" alt=""><figcaption></figcaption></figure>

2. Select the corresponding pool that you want and click on Add Liquidity. In this case, CFX/NUT.

<figure><img src="/files/p7K4mvsXWC0iFJmhL2VI" alt=""><figcaption></figcaption></figure>

3. You have been redirected to Swappi, and now click on Add Liquidity.

<figure><img src="https://lh5.googleusercontent.com/Glm9GGZgZiap3FuZaV4y3EiewCZANEPZcBhFCHMWf6MvcGdV8vs0vrrRQIsKynpkN0mdwDdhpHvYdbBhncvBVsepXxwXRbXJ6PhziaHz_wnA3ibLymki6N7D9Rn8EOACr0IqFFzkl8hQdENgYR4kYBFUa8cjxDaHuniq-KINW7Ew8X3HAXOZDDiB06ZKJg" alt=""><figcaption></figcaption></figure>

4. Click on Select a token.

<figure><img src="https://lh4.googleusercontent.com/ZWlGULgUe-liX-6-PhM132PItmNgXns1fuTY8448pJoukuI8VEWhmUqx2fX6B9ZBpP3XT9s3FEjoNZVq3mcftzfAp5DkG3jnTvtBBEdPBqpy4V8idpQny98vPHYH7sf7nyqcwBAKPIXZU8LdjziCLjDsNXvOLBnMDUesOeEnat3Ds92_JkT4RhFdjxLpRQ" alt=""><figcaption></figcaption></figure>

5. Input NUT and add the token.

<figure><img src="/files/EDbnM2pPxBwkTwBDROyz" alt=""><figcaption></figcaption></figure>

Note: If you cannot find NUT on the token list, simply paste its contract address.&#x20;

NUT Contract Address: 0xFE197E7968807B311D476915DB585831B43A7E3b

6. Enter the amount of asset that you would like to supply and click on Supply.

<figure><img src="/files/9poMVn3J4e3J5S9OTfZ7" alt=""><figcaption></figcaption></figure>

7. Check transaction details and click Confirm Supply.

<figure><img src="/files/jNHoXOTWTp2a8zZ6eyYx" alt=""><figcaption></figcaption></figure>

8. Click on Confirm in the MetaMask pop-out confirmation window.

<figure><img src="/files/Q5VJUufaWQVbNmQBBygY" alt=""><figcaption></figcaption></figure>

9. You have successfully added liquidity to the liquidity pool, please refresh the Nucleon page to show the updated balance of LP tokens.

<figure><img src="https://lh6.googleusercontent.com/TZDNzubMa9Yr8t_kxrew7h37qGB6zqRZQTX_21wwUDysKFDfySKg4ybWzzNNrgT2pwlsrygVrmN5aLBzbQdTZ1greaeaaSzHqtSUOJ2qzx05RfJ8qP6oiCMynnpfiGTW4lzmW40ZEgxPuzBTQ5Y1ePWqcH-ar-oLC56AWOP_3glExOiE8WiZeov7kEKsig" alt=""><figcaption></figcaption></figure>

You can check whether you have successfully received the CFX/NUT - Swappi LP tokens by adding the LP to your wallet.

CFX/NUT Contract Address: 0xd9d5748CB36a81FE58F91844F4A0412502FD3105

<br>


# Stake CFX/NUT LP Tokens

1. Click on Pools.

<figure><img src="https://lh3.googleusercontent.com/mPBoh41sBBFlLqcqfljm3QrWkTWfDuzeOwoRXTmyAtq5_qrNu9tSxvrkoFQbBvY-rk5J8wji8vCaWKy0abtlaiLXkThmvmQ39mUY4O9FgdEWwzSbJf5MUL2gC4pcvDqWlYJxVZ-WzHkMGb3F0sfvElpvPbIolIeL8D-2V1EITfMdJnEsR7AOGdSjgNmZNw" alt=""><figcaption></figcaption></figure>

2. Select the corresponding LP and click on Stake.

<figure><img src="https://lh5.googleusercontent.com/BmRLzSx9ISxUs1O_kqKAYNLWYUYDh3v0n6kRYZNpwLnmYd7yaAILZEd3ximTZaxE4oU8eG4ogBuKiP39wuV1Sci2onCnRt7XjO8IDwK-pNDef-ayQMYWYn5aXRswinF9yjDQrWb_FkGn8CtlG54uvtyH3Qq1ffamDKDfw16a8Gk1tIwApaBhQDHT68xmtg" alt=""><figcaption></figcaption></figure>

3. Manually enter the amount that you would like to stake, or simply use the slider, and then click on Approve Liquidity/Stake Liquidity.

<figure><img src="/files/gXQPMua4vhUISEeEGgtJ" alt=""><figcaption></figcaption></figure>

4. Check transaction details and click Confirm.

<figure><img src="https://lh3.googleusercontent.com/VUcG-spvnbEUeT2DxhqS_S1tJTnpprJwyIUvqgNBN8NIKzoQy2tBqkv4GPw9MlyxSyCueLX0Z6K65njn3574ikAcAIAF_I1AnkZ42DzrxZ3cQjRf_T6PpaOBBT8oOtA2Wn6A_oQGryutq9ihse47YEW07fEjeC4V5bZ6JNC72JnOqYvb6CXWqDOMAa7psg" alt=""><figcaption></figcaption></figure>

5. You have successfully staked, and this should be displayed on the Nucleon page.

<br>

<figure><img src="/files/RawjGh38dGDmLA2P9uiu" alt=""><figcaption></figcaption></figure>


# Withdraw CFX/NUT Liquidity

1. Click on Pools.

<figure><img src="https://lh6.googleusercontent.com/7323vpiZab0ETiDXKM_01D8VDEOfeM4IiJLlShnP8xgKzqPgSG8v0bA8MBBYVXLqKaDZekNUItNRbr0MpmE_GR_YA20grw99CNOk8JZ8rasdtMDDMxrn5aelDUyzmwxTR8ErgwpoZ5ZFbTz6J_wwhIwxk9mMgLOEJS34_A8F2w3aeG3WDw5zAebzIXXLcg" alt=""><figcaption></figcaption></figure>

2. Select the corresponding LP and click on Manage.

<figure><img src="/files/BmKLF34BWsLy1NMbfYTH" alt=""><figcaption></figcaption></figure>

3. Click on Withdraw.

<figure><img src="https://lh6.googleusercontent.com/OpHhFlyQCQbIy_PonkrAIFAJex7TQr3cwKTclvJwqsLaB8ZAyZtzlqH47_4XvI2IGvrXz08060AGrBaroC4_uiPYQ2BULLONraqmUqgUIVAjauoGmBGpF7yjamucldLruWKujP1pHv7w5swBhVvohFAPNH4wYTs6X9SGc80xyrI3mcXPo2O4J1BtSww0Aw" alt=""><figcaption></figcaption></figure>

4. Manually enter the amount that you would like to withdraw, or simply use the slider, and then click on Withdraw Liquidity.

<figure><img src="/files/YoNKx3gs3ASSm6TRlC5p" alt=""><figcaption></figcaption></figure>

5. Check transaction details and click Confirm.

<figure><img src="/files/v8ri53OuZ4mV1L6BmEGd" alt=""><figcaption></figcaption></figure>

6\. You have successfully withdrawn liquidity, and Nucleon will now show the updated balance.

<figure><img src="/files/YqU9Cw0sUEtM9tNAYZWk" alt=""><figcaption></figcaption></figure>

<br>


# xCFX/NUT Liquidity Pool


# Add xCFX/NUT Liquidity

1. Click on Pools.

<figure><img src="https://lh3.googleusercontent.com/pZoh5wjLcW-czM5uaOZ0iGacpKrM3ongAFLiXkVWva9gLlxBuyttZGHoFJ7eEFIXXdr3D9tnKXOewaR4URVxQnglCcl0VTcjPj8_wdRbtMwH5zols2qNtIFcJM8tGTH9ZWLU7Tb7fpp8MBM-RStl6Gi1GbyRqfZZbogOA2kh2OYOEpHmGy4BcCDIJzBiOg" alt=""><figcaption></figcaption></figure>

2. Select the corresponding pool that you want and click on Add Liquidity. In this case, xCFX/NUT.

<figure><img src="/files/UTJqMiP8m0CMvD39zMB7" alt=""><figcaption></figcaption></figure>

3. You have been redirected to Swappi, and now click on Add Liquidity.

<figure><img src="https://lh5.googleusercontent.com/Glm9GGZgZiap3FuZaV4y3EiewCZANEPZcBhFCHMWf6MvcGdV8vs0vrrRQIsKynpkN0mdwDdhpHvYdbBhncvBVsepXxwXRbXJ6PhziaHz_wnA3ibLymki6N7D9Rn8EOACr0IqFFzkl8hQdENgYR4kYBFUa8cjxDaHuniq-KINW7Ew8X3HAXOZDDiB06ZKJg" alt=""><figcaption></figcaption></figure>

4. Click on Select a token.

<figure><img src="/files/lBpoRWNVZcDazQz07OiT" alt=""><figcaption></figcaption></figure>

5. Select the tokens NUT and XCFX

<figure><img src="/files/QNYP2UGfbeZuxDvy8MeR" alt=""><figcaption></figcaption></figure>

Note: If you cannot find NUT or XCFX on the token list, simply paste its contract address.&#x20;

NUT Contract Address: 0xFE197E7968807B311D476915DB585831B43A7E3b

XCFX Contract Address: 0x889138644274a7Dc602f25A7e7D53fF40E6d0091

6. Enter the amount of asset that you would like to supply and click on Supply.

<figure><img src="/files/PKgBcjbf7YsWNcisoadE" alt=""><figcaption></figcaption></figure>

7. Check transaction details and click Confirm Supply.

<figure><img src="/files/7uxGhulODX0Rc2cWiLoZ" alt=""><figcaption></figcaption></figure>

8. Click on Confirm in the MetaMask pop-out confirmation window.

<figure><img src="/files/zFSfyNUorKSwBQZWPajq" alt=""><figcaption></figcaption></figure>

9. You have successfully added liquidity to the liquidity pool, please refresh the Nucleon page to show the updated balance of LP tokens.

<figure><img src="/files/i5QuP8YP8xF3oeMLTZ1b" alt=""><figcaption></figcaption></figure>

You can check whether you have successfully received the CFX/NUT - Swappi LP tokens by adding the LP to your wallet.

CFX/NUT Contract Address: [0x2899e1bec55e7dda574e80e8ef55f17b79df2f1d](https://evm.confluxscan.io/address/0x2899e1bec55e7dda574e80e8ef55f17b79df2f1d)

<br>


# Stake xCFX/NUT LP Tokens

1. Click on Pools.

<figure><img src="https://lh3.googleusercontent.com/mPBoh41sBBFlLqcqfljm3QrWkTWfDuzeOwoRXTmyAtq5_qrNu9tSxvrkoFQbBvY-rk5J8wji8vCaWKy0abtlaiLXkThmvmQ39mUY4O9FgdEWwzSbJf5MUL2gC4pcvDqWlYJxVZ-WzHkMGb3F0sfvElpvPbIolIeL8D-2V1EITfMdJnEsR7AOGdSjgNmZNw" alt=""><figcaption></figcaption></figure>

2. Select the corresponding LP and click on Stake.

<figure><img src="/files/uEhLCLHFRERYksPyuWUo" alt=""><figcaption></figcaption></figure>

3. Manually enter the amount that you would like to stake, or simply use the slider, and then click on Approve Liquidity/Stake Liquidity.

<figure><img src="/files/Ia6O94LFsTbzDsnGkVgM" alt=""><figcaption></figcaption></figure>

4. Check transaction details and click Confirm.

<figure><img src="/files/8Ds2vBSJzaMyz4lpbjwN" alt=""><figcaption></figcaption></figure>

5. You have successfully staked, and this should be displayed on the Nucleon page.

<figure><img src="/files/LLquQRaQqFA4kAhrrEbg" alt=""><figcaption></figcaption></figure>

<br>


# Withdraw xCFX/NUT Liquidity

1. Click on Pools.

<figure><img src="https://lh6.googleusercontent.com/7323vpiZab0ETiDXKM_01D8VDEOfeM4IiJLlShnP8xgKzqPgSG8v0bA8MBBYVXLqKaDZekNUItNRbr0MpmE_GR_YA20grw99CNOk8JZ8rasdtMDDMxrn5aelDUyzmwxTR8ErgwpoZ5ZFbTz6J_wwhIwxk9mMgLOEJS34_A8F2w3aeG3WDw5zAebzIXXLcg" alt=""><figcaption></figcaption></figure>

2. Select the corresponding LP and click on Manage.

<figure><img src="/files/0Wm3IBZSgpgrdhnlWx1U" alt=""><figcaption></figcaption></figure>

3. Click on Withdraw.

<figure><img src="https://lh6.googleusercontent.com/OpHhFlyQCQbIy_PonkrAIFAJex7TQr3cwKTclvJwqsLaB8ZAyZtzlqH47_4XvI2IGvrXz08060AGrBaroC4_uiPYQ2BULLONraqmUqgUIVAjauoGmBGpF7yjamucldLruWKujP1pHv7w5swBhVvohFAPNH4wYTs6X9SGc80xyrI3mcXPo2O4J1BtSww0Aw" alt=""><figcaption></figcaption></figure>

4. Manually enter the amount that you would like to withdraw, or simply use the slider, and then click on Withdraw Liquidity.

<figure><img src="/files/2qO93MUDbKAV5hBZPNbD" alt=""><figcaption></figcaption></figure>

5. Check transaction details and click Confirm.

<figure><img src="/files/m8XUF2o5Fm83y5FojZ8h" alt=""><figcaption></figcaption></figure>

6\. You have successfully withdrawn liquidity, and Nucleon will now show the updated balance.

<figure><img src="/files/0HbHp54x5wdo2iTOhT0z" alt=""><figcaption></figcaption></figure>

<br>


# NUT Governance Token


# Claim NUT Rewards

1. Click on Pools.

<figure><img src="https://lh4.googleusercontent.com/TKyGt9WBarYXke3h81OcaCDuPG538-c_SxVVkJ2y0DGx32LDkR1DB2DmahSq4HAKFlLWu4gphrWGX82CAjrnjPDsI_2J7-umfg__QIp67mnECvP-qmYRjcNZkZiglPuTJq9znlINLoXaq1yT1PK_0GPpGU23X-5aSuK-1sylv7Zm5lEYMWyp0RG99m4BRA" alt=""><figcaption></figcaption></figure>

2. Select the corresponding pool, and click on Claim Rewards.

<figure><img src="https://lh3.googleusercontent.com/wCaIfkRHDsWy-d-ar7SOBada06laPYjrJMPRsoLMzKArcFOmNGHsJXrsfcY4dVd7CXD33X0fOeSMPt2-mv4RWmn_9-_ntlcRgzJYcVmUyOEwHfIrFnprKH0BegB9I6SCtN0DPobF46DwAlKY2IaBLB9B5lr47ULxWsKQ7AfuqdLQpp1fWGwmsx_GknpdEw" alt=""><figcaption></figcaption></figure>

3. Click on Claim Rewards from the pop-out window.

<figure><img src="https://lh3.googleusercontent.com/a67J-5_F9gjLNTiV5lyg4jcfRQiacsiYEw_VwlVO0fKrwhvIjgvi4xSKq3Hl4fMk47AMGkWAElYxb_picON7Pi4F4L3iLq-iZt63tsAtlsfeFjNQYxRmGENBi49VQXkv7hB0lNwdfEIcjPa3EYBOGummFtBMO7zQ5I7tDLZtNzw-eMDaKTWQODGiJVd1MA" alt=""><figcaption></figcaption></figure>

4. Click Confirm on the MetaMask pop-out window.

<figure><img src="https://lh5.googleusercontent.com/kFkc-BbbCEqi5-wuqJj_wVtqYKj3ZKO-_vxYYUSCSkb0QJ5u1_r3SB5wJnyU7Zplu7yqUvuES3pdi8Pfo1toJz3Y75eZWYLgJ_1vH97vJMnjlCfIQs8w-8loqS7Hs10DTOXPUFdK1L_HhL4BeO1GH2Jk5soBl-NudIB-nxseVg0_V5nQYMyPfvdAbpkeyQ" alt=""><figcaption></figcaption></figure>

5. You have successfully claimed rewards.

<figure><img src="https://lh3.googleusercontent.com/AeZNwInVa_V7T-zeFxt5i97chAPxKL_TstoTYqMaIuw7w_NIdqKzufHXZfBVXpc82c1rXfd-PXXOhWYfW7gMLG1sYbKyvc5oGWNywfhchgb4L7itIqjFaz3uR5gxWaWh58jM1bDnDHVRzvq4Hb5XgzYjy_ziqlGd3q1WnOr18S4A1AzC0tCQ7iUylCvEcA" alt=""><figcaption></figcaption></figure>

<br>


# Buying NUT

1. Go to [Swappi](https://app.swappi.io/#/swap).
2. Select the token that you wish to trade-in\ <br>

   <figure><img src="/files/rwjV17c34bQdLDOhTlc7" alt=""><figcaption></figcaption></figure>
3. In the To box, select NUT token.<br>

   <figure><img src="/files/5psfPCxioq9VZM1Dw1z1" alt=""><figcaption></figcaption></figure>

Note: If you cannot find NUT on the token list, simply paste its contract address.

NUT contract address: 0xFE197E7968807B311D476915DB585831B43A7E3b<br>

4. In the From field, enter the amount that you wish to trade.\ <br>

   <figure><img src="/files/Ibg5z76Q3bn75bZPrRlM" alt=""><figcaption></figcaption></figure>
5. Confirm the amount of tokens that you'll receive in the To field and the price impact.\ <br>

   <figure><img src="/files/qJhJQMAbVzbBhFDC1Cvj" alt=""><figcaption></figcaption></figure>
6. Once you review the details and are ready to swap, click **Swap**.<br>

   <figure><img src="/files/zeiTxuP8FjuMAvr0vrVi" alt=""><figcaption></figcaption></figure>
7. In the Confirm Swap dialog, review the transaction details and click **Confirm Swap**.\ <br>

   <figure><img src="/files/G4NSrsmbmA2KHb2XRW6c" alt=""><figcaption></figcaption></figure>
8. In MetaMask, confirm the transaction details and click **Confirm**.\
   **Note**: This transaction might take a few seconds.\ <br>

   <figure><img src="/files/5tGN1ffxTlzlhnAkGo6G" alt=""><figcaption></figcaption></figure>
9. *Optional*: Add the token you just traded to MetaMask.\ <br>

   <figure><img src="/files/gBnOnZhdaWf0v8QeQlti" alt=""><figcaption></figcaption></figure>
10. *Optional*: Review the transaction details on Confluxscan.\ <br>

    <figure><img src="/files/7nebAEwGURpAk19xK3h6" alt=""><figcaption></figcaption></figure>

In the transaction confirmation dialog, you can click **View on Conflux Scan** to see the transaction details on Conflux Scan. You can also add the NUT token that you traded for directly to MetaMask.


# Locking NUT

How to Lock NUT?

In this guide you will learn how to stake NUT in Nucleon.

{% hint style="warning" %}
NOTE: Remember that the NUT will be Locked and that you can't withdraw it until the Locking Period ends.
{% endhint %}

**Step 1**: Open your wallet and connect your account to the NUT platform.

<figure><img src="/files/PsvsUa9ENCzeBAuR0vLc" alt=""><figcaption></figcaption></figure>

**Step 2**: Once your wallet is connected, select the "Lock NUT" button on the platform.

<figure><img src="/files/7qlWjIzImeE8qlDhDjS7" alt=""><figcaption></figcaption></figure>

**Step 3**: At the top of the screen, add the amount of NUT you want to stake. At the bottom, select the duration you want to lock your NUT for.&#x20;

Information about the voting power you will receive and the time your NUT will be locked will appear on the screen.

<figure><img src="/files/P7t91AXecF5w9MQtasgz" alt=""><figcaption></figcaption></figure>

**Step 4:** Select the "Approve NUT/Lock NUT" button.

<figure><img src="/files/7yWTrYGqi8GVI48Ee22b" alt=""><figcaption></figcaption></figure>

**Step 5:** Review the transaction details and click the "Confirm" button to approve the transaction.

<figure><img src="/files/xZpoYXmmESdXuWn7pChv" alt=""><figcaption></figcaption></figure>

That's it! You have successfully staked your NUT on the platform.


# veNUT Management

After you have locked NUT in the platform, you can add more NUT to you veNUT position OR you can also increase the duration of the locking period. This way you can increase the voting power of your veNUT NFT.

To manage your veNUT positions, follow the next steps:

### Increasing Lock Amount

**Step 1:** Go to the NUT section and select the "Manage" button.

<figure><img src="/files/7iGKr7XAyoWbRxhPFkRu" alt=""><figcaption></figcaption></figure>

**Step 2:** Enter the amount of NUT you want to add.

<figure><img src="/files/ZjFUDOR7iawS23Wp4CAU" alt=""><figcaption></figcaption></figure>

**Step 3:** Click the "Increase Lock Amount" button.

<figure><img src="/files/ZjFUDOR7iawS23Wp4CAU" alt=""><figcaption></figcaption></figure>

**Step 4:** Carefully review the transaction details and make sure they are correct. After that, click the "Confirm" button.

<figure><img src="/files/m7eepQNk7iPmuL5Gq7vQ" alt=""><figcaption></figcaption></figure>

If the transaction was successful, a confirmation message will appear on the screen along with a link to review the transaction details and the new lock amount will be updated on the dashboard

<figure><img src="/files/qrEYhO3dJi4da7BekrhN" alt=""><figcaption></figcaption></figure>

### Increasing Lock Duration

**Step 1:** Go to the NUT section and select the "Manage" button.

<figure><img src="/files/hNruZc0zNdlcf2OXNh8x" alt=""><figcaption></figcaption></figure>

**Step 2:** Select the new expiration time.

<figure><img src="/files/q19n6sMuoeRKL4xvrgY0" alt=""><figcaption></figcaption></figure>

**Step 3:** Click the "Increase Duration" button.

<figure><img src="/files/zuqhm82vQ0xpfhi9PZht" alt=""><figcaption></figcaption></figure>

**Step 4:** Carefully review the transaction details and make sure they are correct. After that, click the "Confirm" button.

<figure><img src="/files/wswFdu66iy0WjPLLkurt" alt=""><figcaption></figcaption></figure>

If the transaction was successful, a confirmation message will appear on the screen along with a link to review the transaction details.

<figure><img src="/files/YnFBtvry3KuwucLRrGXU" alt=""><figcaption></figcaption></figure>


# Voting on Proposals

To be able to vote on Nucleon’s governance platform, you will need to lock NUT for a period of time. Your voting power will be proportional to the amount of NUT locked and the lock duration.

To vote on proposals, you can follow the next steps:

**Step 1:** Review the available proposals in the governance platform and select the one you wish to vote on.

<figure><img src="/files/t0wZ0MGmUSbiSnTYZxai" alt=""><figcaption></figcaption></figure>

**Step 2:** Once the proposal is selected, choose the option you want to support. Then, select the "Vote" button.

<figure><img src="/files/brw6w7Uz7NIHz71DhBnb" alt=""><figcaption></figcaption></figure>

**Step 3:** Review the transaction contract and make sure everything is correct. Then, select the "Confirm" button to approve the transaction.

<figure><img src="/files/vcyB5idIb28jYN2aNJzS" alt=""><figcaption></figcaption></figure>

**Step 4:** Once the transaction is confirmed, you can review the transaction details to ensure that your vote has been registered correctly.

<figure><img src="/files/NGMARTEHRREfDwkKgQ6X" alt=""><figcaption></figcaption></figure>

That's it! You have now voted on the selected proposal. Remember, your vote can help decide the final outcome of the proposal.


# Bridges to Conflux eSpace

{% hint style="info" %}
*This page contains quick access tables to help you determine how to bridge your assets to Conflux eSpace from other networks.*
{% endhint %}

### Token Bridging Tables

#### **From Conflux Core**

| Token | Bridged As |             Bridge             |
| :---: | :--------: | :----------------------------: |
|  CFX  |     CFX    | [Fluent](http://link-pending/) |
| cUSDT |    USDT    | [Fluent](http://link-pending/) |
| cUSDC |    USDC    | [Fluent](http://link-pending/) |
|  cETH |     ETH    | [Fluent](http://link-pending/) |
| cwBTC |    wBTC    | [Fluent](http://link-pending/) |
|  cBNB |     BNB    | [Fluent](http://link-pending/) |

#### **From Ethereum**&#x20;

| Token | Bridged As |                            Bridge(s)                           |
| :---: | :--------: | :------------------------------------------------------------: |
|  USDT |    USDT    | [Meson](http://link-pending/), [cBridge](http://link-pending/) |
|  USDC |    USDC    |                 [cBridge](http://link-pending/)                |
|  USDC |    USDT    |                  [Meson](http://link-pending/)                 |
|  ETH  |    wETH    |                 [cBridge](http://link-pending/)                |
|  wBTC |    wBTC    |                 [cBridge](http://link-pending/)                |

#### **From Binance SmartChain**

| Token | Bridged As |                                  Bridge(s)                                 |
| :---: | :--------: | :------------------------------------------------------------------------: |
|  bCFX |     CFX    | [Fluent eSpace Bridge](https://confluxhub.io/espace-bridge/bsc-esapce-cfx) |
|  USDT |    USDT    |                          [Meson](http://meson.fi/)                         |
|  USDC |    USDC    |                          [Meson](http://meson.fi/)                         |

#### **From Other Networks**&#x20;

|  Network  | Token | Bridged As |         Bridge(s)         |
| :-------: | :---: | :--------: | :-----------------------: |
| Avalanche |  USDC |  USDT/USDC | [Meson](http://meson.fi/) |
|   Fantom  |  USDC |  USDT/USDC | [Meson](http://meson.fi/) |
|  Polygon  |  USDC |  USDT/USDC | [Meson](http://meson.fi/) |
|    Tron   |  USDT |  USDT/USDC | [Meson](http://meson.fi/) |


# Contract Addresses

### Token Contract Addresses

<table><thead><tr><th width="204" align="center">Token </th><th align="center">Contract Address </th></tr></thead><tbody><tr><td align="center">NUT</td><td align="center"><a href="https://evm.confluxscan.io/token/0xfe197e7968807b311d476915db585831b43a7e3b">0xFE197E7968807B311D476915DB585831B43A7E3b</a></td></tr><tr><td align="center">XCFX</td><td align="center"><a href="https://evm.confluxscan.io/token/0x889138644274a7dc602f25a7e7d53ff40e6d0091">0x889138644274a7Dc602f25A7e7D53fF40E6d0091</a></td></tr><tr><td align="center">CFX/NUT LP</td><td align="center"><a href="https://evm.confluxscan.io/token/0xd9d5748cb36a81fe58f91844f4a0412502fd3105">0xd9d5748CB36a81FE58F91844F4A0412502FD3105</a></td></tr><tr><td align="center">CFX/xCFX LP</td><td align="center"><a href="https://evm.confluxscan.io/token/0x949b78ef2c8d6979098e195b08f27ff99cb20448">0x949b78eF2c8d6979098E195b08F27FF99cb20448</a></td></tr><tr><td align="center">NUT/xCFX LP</td><td align="center"><a href="https://evm.confluxscan.io/address/0x2899e1bec55e7dda574e80e8ef55f17b79df2f1d">0x2899e1bec55e7dda574e80e8ef55f17b79df2f1d</a></td></tr><tr><td align="center">NUT/CFXs LP</td><td align="center"><a href="https://evm.confluxscan.io/address/0x413039955c96b7fc4e4aa61786de577c3d5c126b">0x413039955c96b7fc4e4Aa61786DE577C3d5c126B</a></td></tr><tr><td align="center">NUT/USDT LP</td><td align="center"><a href="https://evm.confluxscan.io/address/0xbeebccc7420fff17d1108ec12bbce1adc15c6b6c">0xbEEbCCc7420FFF17D1108eC12Bbce1AdC15c6B6C</a></td></tr></tbody></table>
### Contract Addresses

<table><thead><tr><th width="231" align="center">Contract</th><th align="center">Contract Address </th></tr></thead><tbody><tr><td align="center">Echangeroom (Proxy)</td><td align="center"><a href="https://evm.confluxscan.io/address/0x808f81acc4618a05c8253a7b41240468c08cd64c">0x808F81acC4618a05c8253a7b41240468c08cD64C</a></td></tr><tr><td align="center">MasterchefV2</td><td align="center"><a href="https://evm.confluxscan.io/address/0xeced26633b5c2d7124b5eae794c9c32a8b8e7df2?tab=contract-viewer">0xECED26633B5C2D7124B5eae794c9c32a8B8e7df2</a></td></tr><tr><td align="center">DAO Multisig Wallet</td><td align="center"><a href="https://evm.confluxscan.io/address/0xdfbf3c11024023262a3f41cf33175357a136ddb0">0xdfbf3c11024023262a3f41cf33175357a136ddb0</a></td></tr></tbody></table>


# Supported Wallets
The following table shows a list of Conflux eSpace-compatible wallets that are supported by Nucleon:

<table><thead><tr><th width="167.91549099076144">Wallet</th><th>Type</th><th>URL</th></tr></thead><tbody><tr><td>MetaMask</td><td>Web-based, Mobile</td><td><a href="http://metamask.io">https://metamask.io</a></td></tr><tr><td>Fluent</td><td>Web-based</td><td><a href="https://fluentwallet.com">https://fluentwallet.com</a></td></tr><tr><td>TokenPocket</td><td>Web-based, Mobile, Desktop</td><td><a href="https://www.tokenpocket.pro/en/">https://www.tokenpocket.pro</a></td></tr><tr><td>Ledger</td><td>Hardware</td><td><a href="https://ledger.com">https://ledger.com</a> </td></tr><tr><td>OKX</td><td>Web-based</td><td><a href="https://www.okx.com/web3">https://www.okx.com/web3</a></td></tr></tbody></table>


# Using Fluent

Fluent Wallet is a simple and secure multichain wallet built for Web3. Fluent supports connections to Conflux Core Space, Conflux eSpace, and Ethereum. Fluent also supports a native cross-space bridge that allows you to bridge your assets between Conflux Core Space and Conflux eSpace.

## Enabling Fluent as your priority wallet

{% hint style="info" %}
If you don't have MetaMask installed, you can skip this step.
{% endhint %}

If you have MetaMask installed, you'll need to give priority to Fluent over MetaMask in order to use Nucleon. To enable Fluent as your priority wallet:

1. Open your Fluent Wallet.
2. Go to **Settings** > **Advanced Settings**.
3. In Advanced Settings, toggle **Priority Connection** to give Fluent priority over your Metamask wallet when interacting with a dapp.

Now let's connect your Fluent wallet to Nucleon.

## Connecting Fluent to Nucleon

To connect your Fluent wallet to Nucleon:

1. Go to Nucleon.
2. Click **Connect Wallet**.
3. In the Connect a Wallet dialog, select **Fluent**.
4. In Fluent, select **Conflux eSpace** as the network and the account(s) that you wish to connect, then click **Next**.&#x20;
5. Finally, in the Permission Request dialog click **Connect** to finish connecting your Fluent wallet to Nucleon.

Your Fluent wallet is now connected to Swappi! Now, let's go ahead and fund your wallet.


# Using TokenPocket

[TokenPocket](http://tokenpocket.pro) is a multiplatform, multichain wallet. In this guide, you'll learn how to use TokenPocket's mobile app to use Nucleon. Alternatively, you can use TokenPocket's desktop application or web extension.

Using on Nucleon with TokenPocket consists of 3 steps:

1. Installing and configuring TokenPocket.
2. Connecting TokenPocket to Nucleon.

This guide covers both steps.

## Using Token Pocket with Nucleon

### Installation and Setup

1. Download and install TokenPocket from your app store or their [official website](https://tokenpocket.pro/).
2. Once you install TokenPocket, open the app.
3. In the first screen, set up your wallet. In this case we'll set up a new wallet. Tap on **No accounts**.
4. In the Blockchain Networking step, tap on **Conflux eSpace**.
5. In the Add Wallet step, tap on **Create Wallet**.
6. Set a wallet name, enter a password for your wallet and confirm the password. Then check the User Agreement and tap on **Create Wallet**.
7. Read the security information listed and tap on **I get it**.
8. In Backup Recovery Phrase, check all the security tips and tap on **I get it**.

Your TokenPocket wallet has now been set up! Now, let's connect to Nucleon.

### Connecting Token Pocket to Nucleon

1. Go to Nucleon.
2. Tap on **Connect** **Wallet** and in the Connect a wallet dialog, tap on **TokenPocket**.
3. Confirm the connection to Nucleon.<br>

Your wallet is now connected!&#x20;


# Overview

To start using Nucleon, you'll need to fund your wallet on Conflux eSpace with different assets. Transferring assets to Conflux eSpace is super simple and there are different ways to do this.

In short, to transfer assets to your Conflux eSpace account you can:&#x20;

1. Transfer them natively from an exchange, such as KuCoin and Gate.io.&#x20;
2. Bridge them from Conflux Core Space.&#x20;
3. Bridge them from other networks, such as Ethereum and BNB chain.&#x20;

The following image shows an overview of these options:&#x20;

<figure><img src="/files/TY3ZNgXcNYLYi8NkuGHn" alt=""><figcaption><p>Bridging options to Conflux eSpace, from Conflux Core, exchanges, and other networks.</p></figcaption></figure>

Bridging options to Conflux eSpace, from Conflux Core, exchanges, and other networks.&#x20;

* For a quick reference table on which bridge to choose, see: [Bridges to Conflux eSpace](/quick-reference/bridges-to-conflux-espace).&#x20;


# From Exchanges

In this section, you'll learn how to transfer your assets from exchanges to Conflux eSpace.

To learn how to transfer native eSpace CFX from different exchanges, see:

* Binance: [Transferring eSpace CFX from Binance to MetaMask.](/transferring-assets-to-conflux-espace/from-exchanges/transferring-espace-cfx-from-binance-to-metamask)
* OKX:[ Transferring eSpace CFX from OKX to MetaMask.](/transferring-assets-to-conflux-espace/from-exchanges/transferring-espace-cfx-from-okx-to-metamask)
* Kucoin: [Transferring eSpace CFX from Kucoin to MetaMask](/transferring-assets-to-conflux-espace/from-exchanges/transferring-espace-cfx-from-kucoin-to-metamask).
* Gate.io: [Transferring eSpace CFX from Gate.io to MetaMask](/transferring-assets-to-conflux-espace/from-exchanges/transferring-espace-cfx-from-gate.io-to-metamask).


# Transferring eSpace CFX from Binance to MetaMask

{% hint style="info" %}
This tutorial focuses on MetaMask, but you can use any other supported wallet such as Fluent and Ledger devices. See [Supported Wallets](/wallets/supported-wallets) for more information.
{% endhint %}

### Prerequisites

* A Binance account.
* At least 0.1 CFX traded on Binance. You can trade using the CFX/ETH and CFX/USDT markets. To learn how to conduct spot trading on Binance, see: How to conduct spot trading.
* A MetaMask wallet connected to Conflux eSpace. To learn how to connect your MetaMask wallet to Conflux eSpace, see: How to connect MetaMask to Conflux eSpace.

### Transferring eSpace CFX from Binance to MetaMask

1. Log in to your [Binance](https://www.binance.com/) account.
2. From the main menu, select "Wallet" and then click on "Withdraw."

<figure><img src="/files/pC57h2x3LkQ2bqpvJnSv" alt="" width="375"><figcaption></figcaption></figure>

3. In the cryptocurrency search field, type "CFX" and select "CFX - Conflux."

<figure><img src="/files/zqY6o4RT0tAVCOLWMin4" alt="" width="375"><figcaption></figcaption></figure>

4. In the destination wallet address field, copy the address of your Conflux eSpace account from MetaMask.

<figure><img src="/files/Lbmk5fuGKVNnJpjzMfsF" alt="" width="375"><figcaption></figcaption></figure>

5. Select the Network.

<figure><img src="/files/K9BRPGboJYYVRaS3MQLq" alt="" width="375"><figcaption></figcaption></figure>

6. Enter the amount of CFX you want to transfer in the "Amount" field.

<figure><img src="/files/yL5XbKIHzXriPKi8bgzF" alt="" width="375"><figcaption></figcaption></figure>

7. Click "Withdraw" to initiate the transfer.
8. Confirm the transaction details, including the fee and the destination address, and click "Confirm" to complete the operation.

<figure><img src="/files/YlKtVbApMmjiVDVYFV5i" alt="" width="375"><figcaption></figcaption></figure>

9. Enter your fund password, email code, and Google Authenticator/TOTP code, then click Submit request.

<figure><img src="/files/secLjf0PaDj367TfCbZf" alt="" width="375"><figcaption></figcaption></figure>

10. Wait for the transaction to be processed. It may take a few minutes before the CFX appears in your MetaMask account on Conflux eSpace.

<figure><img src="/files/IxR37XXORyZ67Up2XFvZ" alt="" width="375"><figcaption></figcaption></figure>

11. Congratulations! You have successfully transferred CFX from Binance to your MetaMask account on Conflux eSpace.


# Transferring eSpace CFX from OKX to MetaMask

{% hint style="info" %}
This tutorial focuses on MetaMask, but you can use any other supported wallet such as Fluent and Ledger devices. See [Supported Wallets](/wallets/supported-wallets) for more information.
{% endhint %}

### Prerequisites

* An OKX account.
* At least 0.1 CFX traded on OKX. You can trade using the CFX/ETH and CFX/USDT markets. To learn how to conduct spot trading on OKX, see: How to conduct spot trading.
* If necessary, ensure that you have completed any required KYC verification steps to enable withdrawals.
* A MetaMask wallet connected to Conflux eSpace. To learn how to connect your MetaMask wallet to Conflux eSpace, see: How to connect MetaMask to Conflux eSpace.

### Transferring eSpace CFX from Binance to MetaMask

1. Log in to your [OKX](https://www.okx.com/) account.
2. In the navigation menu, go to "Assets" and click on "Withdraw."

<figure><img src="/files/Ltu4taXUzvYb0NBT7gHA" alt="" width="375"><figcaption></figcaption></figure>

3. In the Select crypto to withdraw, enter "CFX" .

<figure><img src="/files/C0YpFexFFKI2FALWK2ZE" alt="" width="375"><figcaption></figcaption></figure>

4. In the select withdrawal method, and select “On-Chain”.

<figure><img src="/files/D07dGVyYFPpaD9AaQVYs" alt="" width="375"><figcaption></figcaption></figure>

5. Copy the Conflux eSpace account address from your MetaMask wallet.

<figure><img src="/files/ndWK3mqeEbF98eFpEGMJ" alt="" width="375"><figcaption></figcaption></figure>

6. Enter the amount of CFX you wish to transfer in the "Amount" field.

<figure><img src="/files/FuA9j7YkBIFeAVQpZTjN" alt="" width="375"><figcaption></figcaption></figure>

7. Review the transaction details, including the withdrawal fee, and click "Next" to initiate the transfer.

<figure><img src="/files/QcYmh4s6JVPmobQ3ce8X" alt="" width="375"><figcaption></figcaption></figure>

8. Enter your fund password, email/phone code, or MFA code, then click Confirm request.

<figure><img src="/files/U8IJQC5pcNjgl9AVRTWG" alt="" width="375"><figcaption></figcaption></figure>

9. Wait for the transaction to be processed. It may take some time for the CFX to appear in your MetaMask account on Conflux eSpace.

<figure><img src="/files/tovVrvSb1U9Dr8OzBKQt" alt="" width="375"><figcaption></figcaption></figure>

10. Congratulations! You have successfully transferred CFX from OKX to your MetaMask account on Conflux eSpace.

<figure><img src="/files/w0tS93Kksd0kofh2S0PQ" alt=""><figcaption></figcaption></figure>


# Transferring eSpace CFX from KuCoin to MetaMask

KuCoin is one of the largest cryptocurrency exchanges in the world. KuCoin supports trading for CFX on Conflux eSpace.

## Prerequisites

{% hint style="info" %}
This tutorial is focused on MetaMask, but you can use any other supported wallet, such as Wallet Connect-based wallets and Ledger devices. \
\
See [Supported Wallets](broken://pages/kMlVHcjGc0ky1k8K7sbo) for more information.
{% endhint %}

* A KuCoin account.
* At least **5 CFX** traded on KuCoin. You can trade using the CFX/USDT market. To learn how to do Spot trading on KuCoin, see: [How to Make a Trade on KuCoin](https://support.kucoin.plus/hc/en-us/sections/4403577442201-Spot-Trading).
* A MetaMask wallet connected to Conflux eSpace. To learn how to connect your MetaMask wallet to Conflux eSpace, see: [Connecting MetaMask to Conflux eSpace](broken://pages/WbybvSMKS510bgYpKcYL).

## Transferring eSpace CFX from KuCoin to MetaMask

To transfer CFX from KuCoin to you MetaMask account on Conflux eSpace:

1. Go to KuCoin.
2. In KuCoin, go to your wallet and click **Withdraw**.\
   ![](/files/WbaplzIfI0pP0UglO0u2)
3. In the Withdraw Crypto search bar, search for "CFX" and click the result.\
   ![](/files/wXGvMVgTi9nZZI0A9IxH)
4. In the Wallet Address field, copy your Conflux eSpace account address from MetaMask.\
   ![](/files/nO2KdCDUPy6lTrOijK0X)
5. In the Network select, select **CFX - Conflux (CFX)**.\
   ![](/files/k94CW5px9EyWGQSfQ2OU)
6. In the CFX Amount field, enter the amount of CFX that you want to transfer.
7. *Optional*: In the Remarks field, add any notes about this transaction.
8. Review the transaction details, the transaction fee and click **Confirm**.
9. In the Tamper-Proofing Confirmation dialog, confirm the withdrawal information and click **Confirm Withdrawal**.\
   ![](/files/k5nHxOEtpHGZxmoFuQJZ)
10. Finally, verify your security details and click .\
    **Note**: The transaction might take a few minutes to process.

![](/files/TmqqdCfgCPVkJJGS1eUz)

You have transferred CFX from KuCoin to your Conflux eSpace account.


# Transferring eSpace CFX from Gate.io to MetaMask

## Prerequisites

{% hint style="info" %}
This tutorial is focused on MetaMask, but you can use any other supported wallet, such as Wallet Connect-based wallets and Ledger devices. \
\
See [Supported Wallets](broken://pages/kMlVHcjGc0ky1k8K7sbo) for more information.
{% endhint %}

* A Gate.io account.
* At least **15 CFX** traded on Gate.io. You can trade using the CFX/ETH and the CFX/USDT markets. To learn how to do Spot trading on Gate.io, see: [How to Conduct Spot Trading](https://www.gate.io/help/trade/trade/16443/How-to-Trade).
* A MetaMask wallet connected to Conflux eSpace. To learn how to connect your MetaMask wallet to Conflux eSpace, see: [Connecting MetaMask to Conflux eSpace](broken://pages/WbybvSMKS510bgYpKcYL).

## Transferring eSpace CFX from KuCoin to MetaMask

1. Log-in to your [Gate.io](http://Gate.io) account.
2. In [Gate.io](http://Gate.io), go to **Wallet** > **Withdraw**.\
   ![](/files/qXGosGL3SyR4dSA8rBoM)
3. In Withdraw, expand the Coin Code select and search for CFX. Then click the result.\
   ![](/files/mxlWZ1Fpq7v1ifVBBvPi)
4. In Chain, select **CFX EVM**.\
   ![](/files/j2EN1F13xoRqhWVV0iax)
5. In CFX Address, enter your eSpace account address.\
   ![](/files/lzTyKPif4H6L42UkT71z)<br>
6. *Optional*: In address description, add a description for this address, such as "My Conflux eSpace MetaMask account".
7. In Amount, enter the amount (in CFX) that you wish to transfer.\
   ![](/files/2SprQwkMOqjhrweIzAbo)<br>
8. Enter your fund password, email code, and Google Authenticator/TOTP code, then click **Submit request**.\
   ![](/files/naLbCIjWeB6BuuD4qIi3)

Your funds have now been sent to your MetaMask account! The operation will take a couple of minutes.


# From Conflux Core

Here are the articles in this section:

{% content-ref url="/pages/nqY33hGPosb3p23O3YDr" %}
[Bridging Assets From Conflux Core with Fluent](/transferring-assets-to-conflux-espace/from-conflux-core/bridging-assets-from-conflux-core-with-fluent)
{% endcontent-ref %}


# Bridging Assets From Conflux Core with Fluent

1. In Fluent, click the **Cross-Space** icon or go to [https://evm.fluentwallet.com](https://evm.fluentwallet.com/).\
   ![](/files/UAyvsZjqX6lDjGAEV0OK)
2. Verify that your Conflux wallet is connected to the site.\
   ![](/files/JIaIY2lRvXcSCMqiRFtR)
3. Go to MetaMask and verify that you are connected to the Conflux Hydra (eSpace) network.\
   ![](/files/dXtdduI4M4RLxHuENMhE)
4. Copy your Conflux eSpace wallet address.
5. Go to the Conflux eSpace Destination Address field and enter (or paste) your Conflux eSpace wallet address.\
   ![](/files/6gaI5XBgDmaNsWK7gBUy)
6. In the Amount field, enter the amount that you want to transfer to your Conflux eSpace wallet and click **Transfer**.\
   ![](/files/lLKQ4JLxuGaXH2YTaDes)
7. In the Sign Transaction dialog, click **Confirm** to confirm the transaction.\
   ![](/files/LHLW7jLTyVgxGBjZUz1A)
8. After the transaction has been confirmed, go to MetaMask and verify that you received the funds from your Conflux Core Space wallet or check your balance in the [Confluxscan eSpace block explorer](https://evm.confluxscan.io/).

Your assets have been successfully bridged to Conflux eSpace!


# From Other Networks

In this section, you'll learn how to transfer your assets from other networks, such as Ethereum and BNB Chain, to Conflux eSpace using different cross-chain bridges.

* You can use the [cBridge](broken://pages/dYeJJ0y0PkiuqPUa9qtK) and [Meson](broken://pages/G51zHu3Rieydgohq2nia) cross-chain bridges to transfer your assets from other networks to Conflux eSpace.
* For a quick reference table to bridges to Conflux eSpace, see [Bridges to Conflux eSpace](/quick-reference/bridges-to-conflux-espace).
* Once you bridge your assets to Conflux eSpace, you'll need to add the token contract addresses to MetaMask. See [Token Contract Addresses](/quick-reference/contract-addresses) to see the contract addresses for different tokens, such as USDT, cETH, and cBTC.


# Bridging from BNB Chain with the eSpace Bridge

The eSpace Bridge is a cross-space and cross-chain bridge, that allows you to transfer CFX and other tokens between across spaces (Core Space and eSpace) and across chains (eSpace and BNB Chain).

In this guide, we'll bridge CFX from **BNB Chain** to **Conflux eSpace** through the eSpace Bridge.

## Prerequisites

* Your MetaMask wallet connected to Conflux eSpace and BNB Chain.
* A BNB Chain account funded with bCFX and BNB.
* A Conflux eSpace account funded with CFX to pay for transaction fees.

## Bridging CFX to BNB Chain to Conflux eSpace with the eSpace Bridge

1. Go to [ConfluxHub](http://confluxhub.io).
2. Ensure that you're in the eSpace Bridge.\
   ![](/files/1BWGvmi5jZnDFGVXgkib)
3. In the **Between BSC and eSpace** box, click **Go**.\
   ![](/files/ykQCwpWqgHlXsckmDJry)
4. Click **Connect MetaMask** to connect your MetaMask wallet.\
   ![](/files/EebQwnDLklvQVuauBrHm)
5. In your MetaMask notifications, select the account that you want to connect and click **Next**.\
   ![](/files/VVGWPUvMRRcT6mgZDGDg)
6. In the **Connect to My Conflux...** notification, click **Connect** to confirm the connection of MetaMask to the eSpace Bridge (ConfluxHub) site.\
   ![](/files/QQ2FYl2lOCAFTzV1uUoi)
7. In the token field, select **bCFX (BSC Conflux)**.\
   ![](/files/lUaZC7FuO1THAUjAVcj6)
8. In the amount field, enter the amount of bCFX that you want to bridge from BNB Chain to Conflux eSpace, then click **Approve**.\
   ![](/files/kdRTeGIf5TVJBeW6dIMi)
9. In the MetaMask notification, click **Confirm** to give permission to the eSpace bridge to transfer your tokens.\
   ![](/files/j3CY1vWVLS0y5vi6dyHT)
10. Once, the approval is submitted, click **Send** to start sending your bCFX to Conflux eSpace.\
    ![](/files/a3MLzUWC3lUNTIZwSePQ)
11. In the MetaMask notification, click **Confirm** to confirm the transaction.\
    **Note**: This transaction may take some seconds or up to a minute.\
    ![](/files/4lGHdUx6ZBXvh81OiIDj)
12. Once you receive the notification that your tokens are claimable, go to MetaMask and switch to the Conflux eSpace network.\
    ![](/files/OfRw9uj2yUUPuyzzQXl2)
13. In the eSpace Bridge, click **2** to start claiming your funds in Conflux eSpace.\
    ![](/files/JwvxqVjEFCOJuT6UBnBU)
14. In 2 - Claim CFX, you'll see your claimable funds on eSpace. Click **Claim** next to your funds.\
    ![](/files/CqqnA1dvE95sVD2Bov9t)
15. Now, go to MetaMask and click **Confirm** to confirm the transaction.\
    **Note**: This transaction may take some seconds or up to a minute.\
    ![](/files/J2nE1usDmWPsTPkP4UBU)<br>

Your funds were now successfully bridged to Conflux eSpace!


# Bridging Assets from Ethereum with cBridge

[cBridge](https://cbridge.celer.network) is a cross-chain bridge that supports multiple networks. With cBridge, you can bridge tokens such as USDT, wrapped ETH, and wrapped BTC from Ethereum to Conflux eSpace, or from Conflux eSpace to Ethereum.

In this guide, we'll bridge USDT from Ethereum to Conflux eSpace through cBridge.

## Prerequisites

* At least 21 USDT in the Ethereum network.
* ETH to pay for gas transactions.
* Your MetaMask wallet connected to Conflux eSpace.

## Bridging USDT from Ethereum to Conflux eSpace with cBridge

1. Go to [cBridge](https://cbridge.celer.network).
2. Click **Connect Wallet** to begin connecting your wallet.\
   ![](/files/yyhpJAWUvVM2OhEG8Ox6)
3. In the Connect Wallet dialog, click **MetaMask**.\
   ![](/files/Dl7xYGpaPXAn43Mf0CHK)<br>
4. Confirm the connection to the site in MetaMask.\
   ![](/files/O5TcNodRYo5hPxjMhDuI)
5. Once your wallet is connected, in the From field, select **Ethereum Mainnet** as the source chain.\
   ![](/files/Z2R9AcT2VvrQxfqazNXv)
6. Select USDT as the token.\
   ![](/files/rNyPU5x74hBjj37ajY2a)
7. Enter the amount of USDT that you want to transfer.\
   **Note**: You'll need to transfer more than 20 USDT.\
   ![](/files/N1BuIuMjgTmlg2AVO7Eq)
8. Click the the dropdown, search for "Conflux" in the Select Destination Chain dialog, and click **Conflux**.\
   ![](/files/eN0ZSZ0RPSRnR4i4kvcn)
9. Review the transfer information and click **Approve cBridge to use your USDT**.\
   ![](/files/xkG8mzFqSTvJipFBxoAx)
10. In MetaMask, grant permission to cBridge to access your USDT by clicking **Confirm**.\
    ![](/files/99Dz3H44BzTNgd1KAjHF)
11. Once you the permission is approved, click **Transfer** to begin transferring your tokens.\
    ![](/files/yVx4GsiMoPj7MrvvquHE)
12. In the Transfer dialog, click **Confirm Transfer**.\
    ![](/files/ik7qTq7RV2gjMk7yK1by)
13. In MetaMask, review the transaction details and click **Confirm**.\
    ![](/files/hBtxmjrNBpC4RUElhMzB)

Your funds are now being bridged to your account in Conflux eSpace. It may take a few minutes for the funds to be reflected in your account.

![](/files/W5phv1DFjfcPFoC1flOv)


# Bridging Stablecoins with Meson

[Meson](http://meson.fi) is a stablecoin cross-chain swap protocol that supports multiple networks. With Meson, you can bridge either USDC or USDT tokens from different networks into Conflux eSpace, or from Conflux eSpace to other networks.

In this guide, we'll bridge USDC on BNB Chain to USDT on Conflux eSpace through Meson.

## Prerequisites

* A USDC or USDT stablecoin on any of the following networks:
  * Ethereum (USDC/USDT)
  * BNB Chain (USDC/USDT)
  * Tron (USDT)
  * Avalanche (USDC)
  * Fantom (USDC)
  * Polygon (USDC)
  * Conflux (USDC/USDT)
* Your MetaMask wallet connected to Conflux eSpace.

## Bridging Stablecoins to Conflux eSpace with Meson

1. Go to [Meson](https://meson.fi/).​
2. Click **Connect Wallet** to connect MetaMask to Meson.\
   ![](/files/vHRz3IAfSTZjX3MtzRVh)
3. Select the account(s) that you wish to use on Meson and click **Next**.\
   ![](/files/2PM4bOyhL4wXxuZRr7I7)
4. Confirm the connection to the site by clicking **Connect**.\
   ![](/files/lTDXZrSNvJAnSg1tm7Ep)\
   Your MetaMask wallet is now connected to Meson. Let's now bridge our tokens.
5. In the **FROM** drop-down list, select the network that you'll transfer your assets from (for example: BNB Chain).\
   ![](/files/YySyImM5gER66EgCvlkZ)
6. In the token type drop-down list, select **USDC**.\
   ![](/files/RtNRkXPMU8IQw32sCnkX)
7. Enter the amount of USDC that you want to transfer.\
   ![](/files/aYxemnEWVVDGmy4YJnvh)
8. In the **TO** drop-down list, select **Conflux eSpace**.\
   ![](/files/vIGKWPfizpSwusZX8LZS)
9. Confirm the transaction details and click **Swap**.\
   ![](/files/506jC25ekvMuYGwUDkYu)
10. In the Approve dialog, click **Approve** to invoke MetaMask and grant Meson permission to access your funds. \
    ![](/files/ghzKsOu2wmdpDoXgFSSU)\
    **Note**: The approval operation requires a gas fee, however, this is the only time you'll need to pay for gas, the gas fee for other steps are on Meson.
11. In MetaMask, click **Confirm** to give permission to Meson to access your funds.\
    ![](/files/PXFir2vG0xYBgpuTouqj)
12. Once you grant permission to MetaMask, click **Confirm** in the Swap Summary to confirm the swap transaction you're about to do.\
    ![](/files/3M8r6PePm6r6TPlLNWq8)
13. Now, in MetaMask, click **Sign** to sign and proceed with the transaction.\
    ![](/files/sLFg4SIkmVL9ZsH2Yq6y)
14. In the Swap Summary, wait for the swap request to be processed. \
    **Note**: This may take around 1 minute.\
    ![](/files/dsmTCEoPP9qKjDt8Mznq)
15. Once the swap request transaction is processed, click **Sign** on MetaMask to release the funds in Conflux.\
    ![](/files/V1bbgiJ0b7H7RCtl4T2W)\
    You have now bridged your funds to Conflux eSpace!

## Verifying Transactions

To verify the transaction:

1. Open the wallet menu.\
   ![](/files/ZuE98Sn8ajNzglM079jQ)
2. Click on the Swap ID to open the Meson transaction explorer.\
   ![](/files/xZ3GtxrZBw6sPsBc3nMv)<br>
3. You can verify the transactions on both networks' transaction explorers.\
   ![](/files/BtGcS9gupRyGDmfAeX1S)

## Additional Resources

* To learn more about Meson, check out Meson's blog at <https://medium.com/@mesonfi>.<br>


# Readme

Brand Marketing and Guidelines

## Intro

Please be sure to read these guidelines first before using any brand assets.&#x20;

Although Nucleon distributes some of its technology under open-source licenses, the Nucleon, xCFX and NUT brands are not distributed under the same licenses.&#x20;

The following Nucleon "Brand Assets" are copyrighted material, and you may only use them in accordance with the policy detailed below:&#x20;

* The Nucleon, xCFX and NUT logos, word mark, icon&#x20;
* The Nucleon name
* Other visual assets produced by Nucleon

## What you may do

You may use Nucleon's Brand Assets when you are:&#x20;

* Referring to our products and services&#x20;
* Linking to our official site or products, such as "Liquid Staking on Nucleon"
* Announcing an official partnership, but only if you have official approval by a qualified member of the Nucleon team&#x20;

For information on other uses of our Brand Assets, please reach out at&#x20;

## **What you may not do**

We firmly believe in the open-source ethos of Web3 but protecting the Nucleon brand is extremely important for our users' security, so that users know what a genuine product/endorsement is and what isn't.&#x20;

Here are a few examples of forbidden uses of our Brand Assets:&#x20;

* Don't use our Brand Assets in your products' name, logo, NFTs, etc. &#x20;
  * For example, making an app called " Nucleon CAR" or "NUT BIKE" are not allowed.&#x20;
  * Don't use the Nucleon logo in whole or in part as part of your products' logos, marketing material, website, or other.&#x20;
  * Logos with a strong resemblance to the Nucleon Icon are also forbidden.&#x20;
* Don't use our Brand Assets to create digital or physical products for sale, including but not limited to&#x20;
  * Merchandise ("Swag")&#x20;
  * NFTs&#x20;
  * Other products&#x20;
* Don't create derivative names that imply official endorsement&#x20;
* For example, don't make a social media group called " Nucleon Spain" - this sounds official. " Nucleon Fans of Spain" may be permitted.&#x20;
* Don't change or adapt our Brand Assets in any way&#x20;
  * Use the logos and other assets exactly as provided. Do not change the colors, reassemble, abbreviate, or change these assets in any way.&#x20;


# Downloads

<div><figure><img src="/files/ViIw3h1hsWq0lJEKTo93" alt=""><figcaption></figcaption></figure> <figure><img src="/files/mH5JELjY0rq8vUlgZH5l" alt=""><figcaption></figcaption></figure> <figure><img src="/files/qcr6jVsl6UfugmfEjid8" alt=""><figcaption></figcaption></figure> <figure><img src="/files/UINAfPikzGdGDw0cdaUn" alt=""><figcaption></figcaption></figure> <figure><img src="/files/1jWZMkd8q2FLIK4Je8ZR" alt=""><figcaption></figcaption></figure></div>

<figure><img src="/files/kl3DaXp8WHXjXVxSPy9z" alt=""><figcaption></figcaption></figure>

<figure><img src="/files/WhqCrN8RBrM0oxVZcNDW" alt=""><figcaption></figcaption></figure>

<figure><img src="/files/Q9lyz8C1WpFCd74sDIXk" alt=""><figcaption></figcaption></figure>

<figure><img src="/files/1VOXqqOXmFAoFZlswhxR" alt=""><figcaption></figcaption></figure>


# Social Accounts & Communities

**Linktree**: <https://linktr.ee/OfficialNucleon>

**Github**: <https://github.com/article-i/nucleon>


# Business Partnerships

For Business Partnerships, please send an email <hello@nucleon.space>


# Fixing Stuck Pending Transactions in Your Wallet

How to ‘unstuck’ any pending transactions that are stuck in your wallet.

Every once in a blue moon there can be a hiccup in the transaction in your wallet that the cancel button just can't fix. This walkthrough will essentially wipe the pending transaction by sending a new transaction that replaces the order by resetting the pipeline.

1. **Enable Custome Transaction Nonce**
   1. Open the MetaMask plugin on your browser
   2. Click the multcolored circle in the upper right of the popup. Usually opposite of the fox head icon

      <figure><img src="/files/3k6yZxNrEfHgUoJK6uf8" alt=""><figcaption></figcaption></figure>
   3. Select Settings

      <figure><img src="/files/20XkSTAvqkoKFsyy0hIf" alt=""><figcaption></figcaption></figure>
   4. Select Advanced

      <figure><img src="/files/IQHsvcb15mGbWluiD9me" alt=""><figcaption></figcaption></figure>
   5. Scroll to Advanced gas controls and make sure the toggle is in the on position

      <figure><img src="/files/oNTfYDvJo0LvNJTFIIfg" alt=""><figcaption></figcaption></figure>
   6. Still in the advanced section, go to customize transaction nonce and make sure this is toggled on too

      <figure><img src="/files/4T1U4srTEHWfoWeqSH5s" alt=""><figcaption></figcaption></figure>
2. &#x20;**Find the Stuck Transaction**

We need to find the stuck transaction and remember the nonce. The nonce is an identifier that we will be using later

1. Back at the main Metamask screen select the **Activity** tab and find the token that is stuck in the transaction.&#x20;

   <figure><img src="/files/uXS4hPd4Nr7a4OMZLyGq" alt=""><figcaption></figcaption></figure>
2. Look for the nonce and note the number

   <figure><img src="/files/sGDWUGX8ZqITOd8R6YBP" alt=""><figcaption></figcaption></figure>
3. **Overwrite the Stuck Transaction**

**Essentially we will be making a new transaction to replace the stuck transaction and we will put in the same nonce as the old transaction**

1. Create a new transaction with a higher gas fee. In the MetaMask popup select **edit** for the estimated gas fee.

   <figure><img src="/files/bGWu9Jk0OZOVxHBBdYOD" alt=""><figcaption></figcaption></figure>

Remember the gas fee increases the priority of the transaction and will ensure that this nonce is accepted over the old stuck transaction in your wallet.

<figure><img src="/files/K2c3xsj7R2el4Kahhvse" alt=""><figcaption></figcaption></figure>

&#x20; 2\.  On the confirmation screen ensure the gas fee has really been increased.

<figure><img src="/files/GtzBI1gEOOdzWbmQvixp" alt=""><figcaption></figcaption></figure>

&#x20; 3\.  Find the custom nonce entry and put in the nonce we noted earlier.

<figure><img src="/files/6xKi442tdiZik2yy61CY" alt=""><figcaption></figcaption></figure>

&#x20; 4\.  Click **Confirm.**

&#x20; 5\.  The transaction should be accepted. Go to the activity section of your MetaMask wallet to make sure it went through.

**Remember that transactions are fast but not instantaneous. Be patient and give the transaction time to process. You can increase the gas fee to increase its priority if you want to. You don't need to worry about a duplicate transaction because no wallet can process the same nonce identifier twice.**&#x20;